Posted in quilting

F.O. Friday: Round Robin Quilt

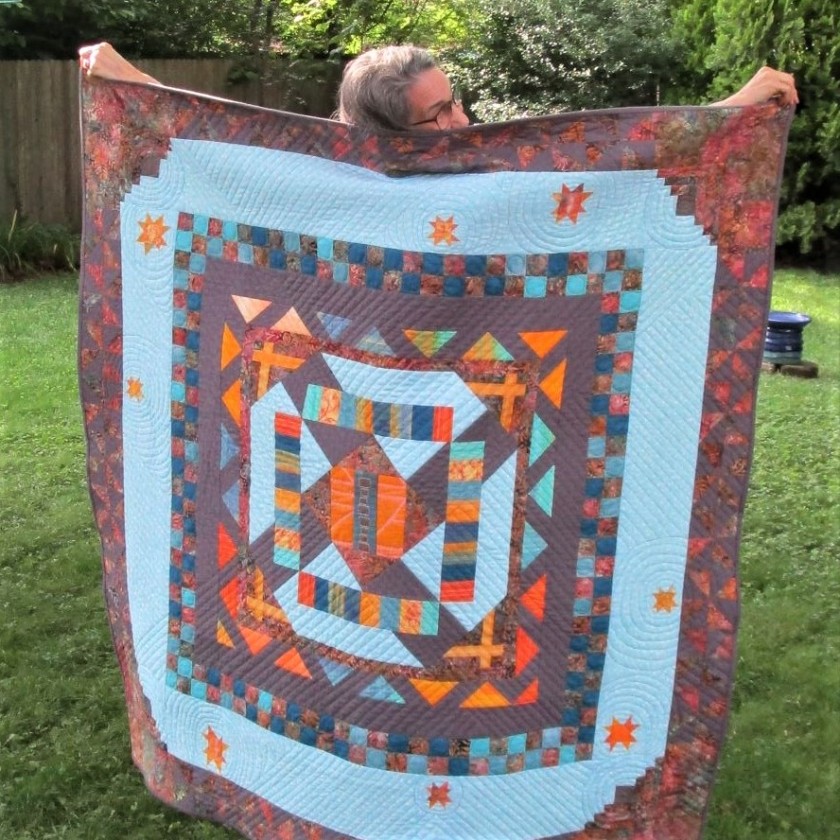
I’m so happy to get this fiber object moved to the finish line.

CAN YOU TELL HOW HAPPY I AM?

This is my Stay at Home Round Robin quilt, a group quilt project that took place in January and February. You may recall some of my earlier posts on this topic.

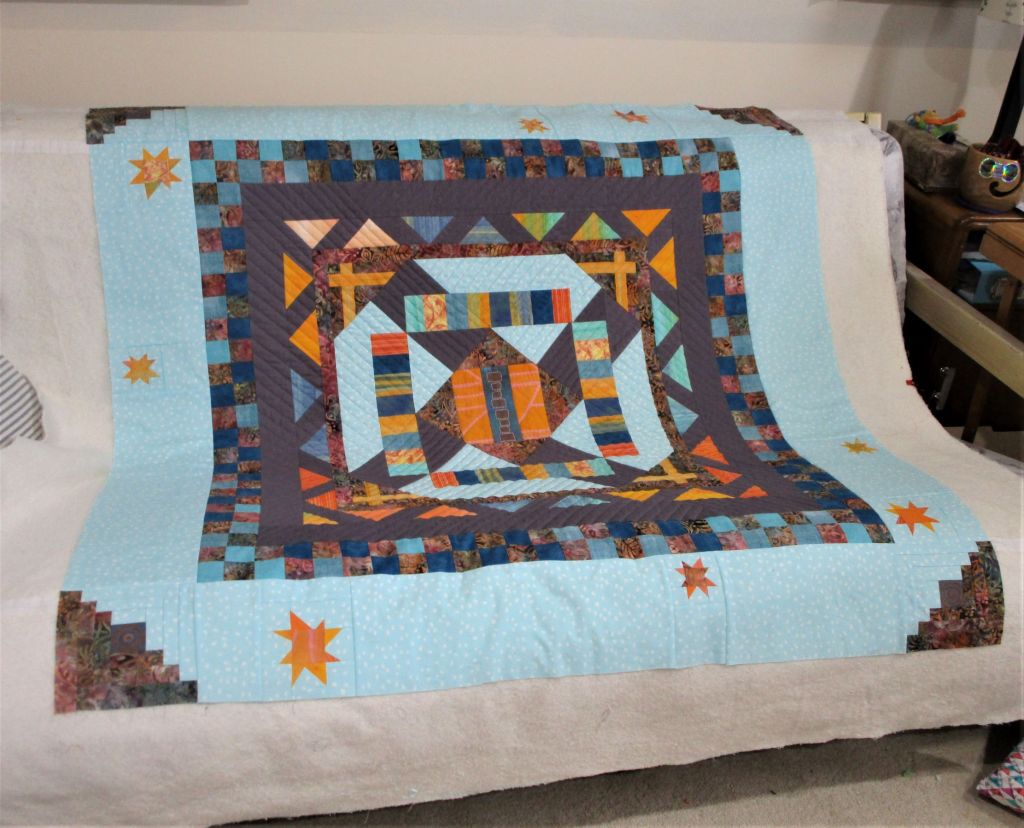
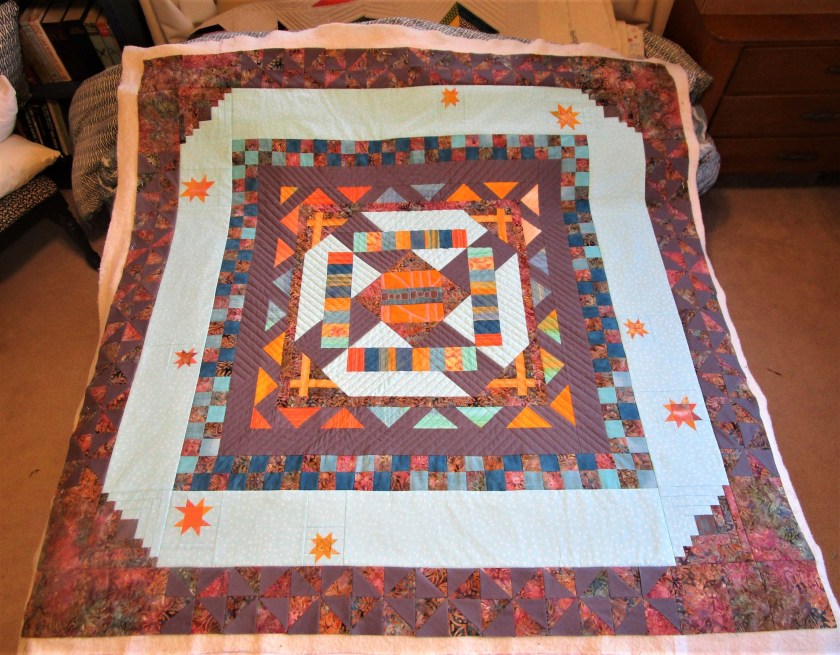
After all the piecing was complete, I was unsure of how to quilt it. In the quilt’s center I had used the walking foot to sew parallel lines that pinwheeled outward. But the checkerboard border seemed to act as a visual line, stopping the progress of the parallel stitch lines.

After months of procrastination, I made some decisions. The checkerboard border was quilted free motion in a sort of figure eight pattern (the symbol for Infinity.) Each square ended up with a circle inside it. I then continued my parallel lines beyond the checkerboard all the way out to the edge. EXCEPT: I sewed spirals (the shape of galaxies) around the stars and log cabin corners. The straight lines filled in everywhere else.

I call this quilt Expanding Universe. Each challenge caused the quilt to expand over and over. And the choice of a pinwheel block in the center, with corresponding smaller pinwheels in the last border reinforced the idea of spinning outward. The finished quilt measures 60 inches square.

Thanks to brother-in-law Steve for snapping these lovely photos of me enjoying my Expanding Universe.

Posted in painting, quilting

Spring Green Progress

This past week I spent a good amount of time on this project. Since the background fabric is complete, I focused on the subject and the foreground. On Wednesday, I got out my fabric paints and created some terracotta and dark neutral colored swatches.

While the fabric was drying, I finalized the design layout. Because the foreground was the interior of a building, I decided to use the piecing instead of applique technique. The stitch lines would be straight and follow the lines of the greenhouse interior. Here is the full-scale drawing that I used to make the pattern pieces.

Next I traced each of the lettered sections, cut the traced images apart, pinned them to the fabric and cut each piece.

Following my decision to use a reverse-applique technique to replicate the little seed pots, I had made a template with elliptical shapes. I now traced these shapes onto the corresponding fabric pieces.

One of three sections that have seed pots.
Ellipses are cut out
Laying the cut-outs over the background fabric to check placement

Everything looked like it would fit. Starting with piece A, I sewed the pieces to each other in alphabetical order and stitched the resulting block to the background fabric.

Completed piecing.

My vision is that the bright green color glowing up from each seed pot symbolizes the energy released by the seed as it germinates. You know what I mean – like the way superheroes are drawn.

Here is an image of the project as it stands now.

I awoke several times during the night to ideas about the next step swirling around. I had so many of them! When I awoke early this morning, I could recall only a few. Too bad. I guess I could force myself to get out of bed when this happens, track down my notebook and write those ideas down. But I digress.

The next steps involve adding some final touches of paint, stitching down the raw edges of the ellipses and making the quilt sandwich.

I will also practice drawing and stitching the seedlings before working them on the real thing.

Posted in quilting

Finished Object Friday – Quilting

After three months, I have finished the pet-friendly quilt that started with this fabric.

Inspired by Rayna Gillman’s improvisational piecing technique and using a combination of log cabin and strip pieced squares, I designed a pair of blocks I call Dog House, Cat Barn.

The blocks finish at 12 inches square. But how can they turn into a bed quilt? After mulling it over for awhile and making several sketches on graph paper, I found that I could fit four blocks across five rows to come up with a twin-size quilt. To create balance, I staggered the rows by four inches with a spacing strip, alternating between left side and right side every row.

I also felt that the balance would improve if the center row was different. Thus was conceived the Pet Condo construction project in “mid-town,” (if you will permit my flight of fancy.)

Four inches of sashing in a grey polka-dot fabric between the rows made a “street,” giving the animal neighbors a nice boulevard for walking over to visit. With my concept complete, I re-named the quilt Animal Friends.

Oh, another group of animal friends were introduced via the background fabric: Our hardworking and very dear bees.

The Animal Friends quilt measures 57 by 84 inches. It was quilted with a combination of walking foot “stitch in the ditch” and free motion stitching on my Bernina.

Posted in quilting

SAHRR 2021 Last Round Celebration

GOTCHA. Okay, I have some personal business to share before I tell you about the last challenge of the Stay at Home Round Robin. Yes, today is my birthday. Mr. Mouse and I were celebrating this occasion, but he has a math problem for you. (I’m not telling my age. But I will give you a clue. I have a 12 year old grandson.) If you like math problems, chew on this: The first integer of my current age times the second integer plus 20 will give you how old I turned today. Good luck!

Now to the quilt top. At the end of the last round I had added log cabin squares to each corner. It looked like this:

Quilting Gail told us to add pinwheels.

SAHRR – Round # 7 ‹ Quilting Gail ‹ Reader — WordPress.com

I was happy to hear that because I like unity in my work. The center block has a sort-of pinwheel, and now I can echo that shape in the final border.

Of course, I had never made a pinwheel square before. Here is my first one.

The technique I chose was quick, but I ended up with bias edges on all sides of my pinwheel. This meant I needed to be very Careful Not to Stretch them out of shape. And I had 31 more to make, if I wanted the pinwheels on all sides.

Long story short, after careful cutting and lots of spray starch, the pinwheels were done. I sewed them into a border and attached the border gingerly to my quilt.

Close up of corner

My finished top is 60 inches square. I’m so pleased! Now I have until March 29th to get it quilted and bound before uploading images to the last link party. I also need to give this quilt a name. Two different thoughts come to mind:

  1. The spinning pinwheels, the combination of hot and cold colors and the scattered stars suggest to me “The Expanding Universe.”
  2. On the other hand, when I studied the patterns and shapes, I think of ancient maps, at a time when the far reaches of the earth were unknown. “The Earth is Flat.” or “Here be Monsters.”

I’d love to hear your choices. Also, anyone who does the math and guessed my age will receive a hand-painted postcard.

Posted in quilting

SAHRR Challenge #6 – Almost Done

This week’s assignment is Log Cabin block. I’m a fan of this block and find it useful in improvisational quilts and as a background for art quilts. When I woke up this morning, I had a good idea for incorporating this block into my design. So I got right to work on the challenge.

Because I have not yet sewn the wonky stars border on, I can still incorporate the log cabin blocks into it. My plan is to use the pale blue fabric and the flowered batik fabric to make four log cabins and attach them in the corners of the wonky star border. For the final challenge (whatever it may be) I will use the flowered batik as my primary fabric. This will tie what has come before to what comes next. Follow along and you will see.

Here are my four log cabins.

I used a one and one half inch center and cut the light and dark strips to finish at 3/4 inch. These are three rows of each color, giving me a finished block of 6 inches – the same as my light blue star border.

Next I got out my fabric paint and added a metallic motif to each center square.

I think they look like eyes in the heavens.

Laying each block with the pale blue to the inside and the batik fabric to the outside, I get this effect:

Lower right corner
Lower left corner

With the log cabin blocks done, I return to building the quilt sandwiches for the four sides. They will be about 12 inches wide each. This includes enough allowance for the quilting. At this point, I am expecting my quilt to finish out at around 60 inches square – a good size to use as a lap blanket.

Don’t forget to check in with the others who are building round robin quilts. They are showing a tremendous variety of styles and some ingenious solutions to the challenges.