Posted in drawing, recycling

Autumnal Equinox 2021

Today I want to celebrate the changing of seasons. Weather-wise, it’s still summer here. But a cool front is expected here in the next 12 hours.

I am hopeful for cooler breezes.

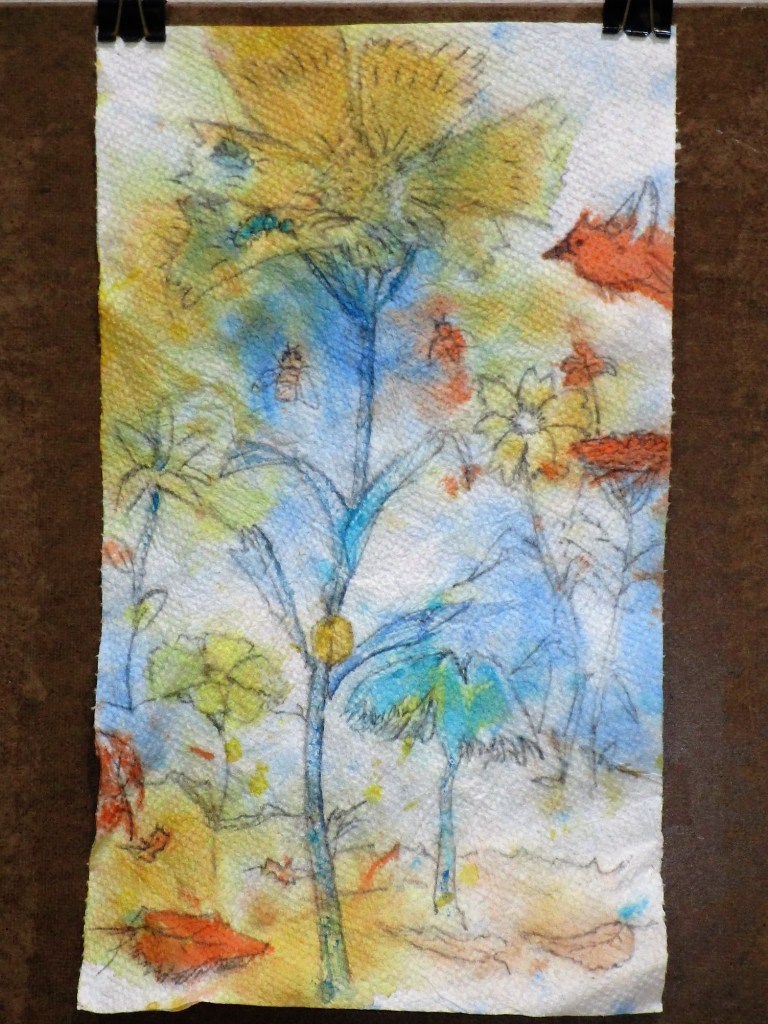
With the idea of using non-traditional materials for this art piece, I started by rummaging through my paper storage drawer. Among the half-used scrapbook pads, pages from old calendars, brown paper bags, pieces of card stock and carefully saved rice paper, I came across this:

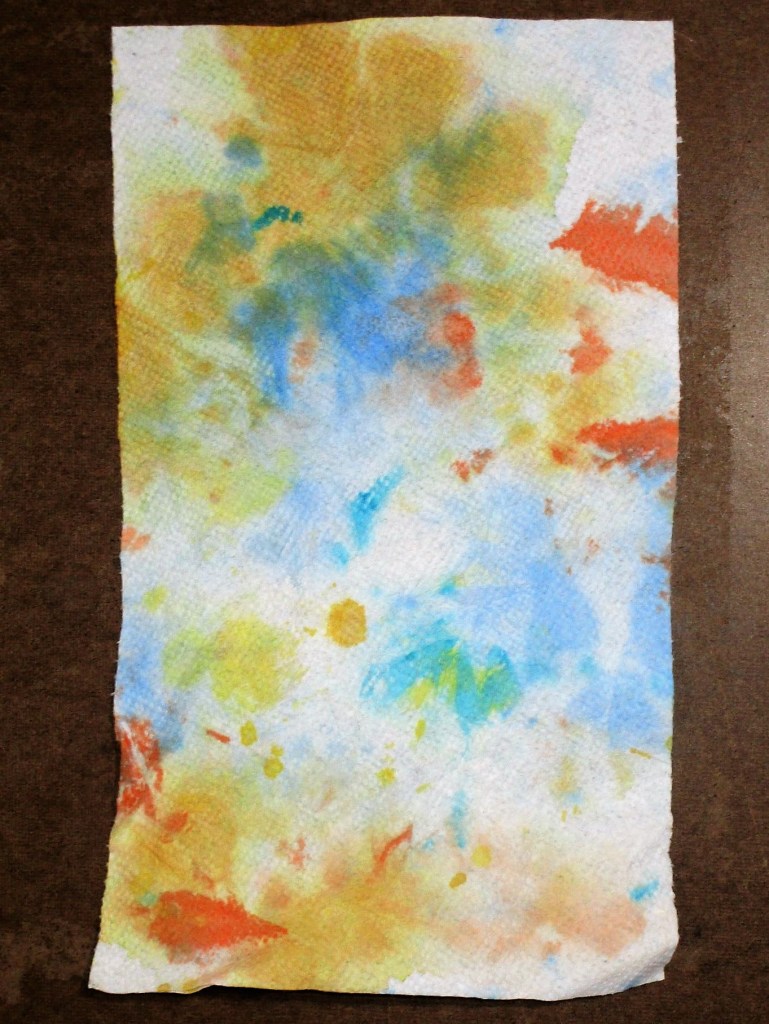
Yes, your eyes do not deceive you. This is a paper towel that had been used as a wiping rag. If I had to guess I would say this it is covered in fabric paint, because it was fiber artist Cindy Walter who suggested that I save my used paper towels.

https://www.craftsy.com/class/fun-techniques-with-fabric-paints/

Well, why not, I told myself. This could be made into something, by applying a little imagination and some carefully chosen marks.

The towel was quite fragile, so I started with a 4B pencil. Flowers, I thought. Working through the blobs and streaks, I decided to include other living things that associate with flowers. These creatures are currently busy preparing for the coming of winter. I drew beetles, bees, caterpillars and a curious cardinal. Soon the paper was full of pencil marks. I considered adding color. In the end I did put a tiny bit of blue paint onto the stems, but refrained from adding other embellishments, due to concern about damaging the paper towel.

HAPPY EQUINOX TO ALL.

May this fragile drawing remind you of the frailty of life and our pledge as stewards of the earth to preserve it.

Posted in knitting

F.O. Friday – Adult Booties

I got started on this project because of a problem I encountered during the recent SuperSnow event. It was SO cold for SO long I found myself wearing my hand knitted wool socks night and day. Don’t get me wrong, I love wearing cozy hand-knitted wool socks. But at the end of the cold snap, I examined both pair and noticed that the soles were thinning out. Unless I got busy with repairs, I would be down at least one pair for the duration. So I decided that I needed warm cozy wool footwear that would hold up to walking many miles on our cold hard tile floors. Hence the dorm boots.

This pattern is offered on Kriskrafter’s blog.

Kriskrafter: Better Dorm Boots – Lace Edition – Free Knitting Pattern! (auntekristy.blogspot.com)

It has all the characteristics I needed: Thick soles, fast to knit and used a miniscule amount of yarn. I rummaged through my stash and found some nasty beige acrylic-wool blend in a heavy worsted. The pattern calls for holding yarns double, so I worked from two skeins for the sole. My stash rummage also yielded a sturdy pink wool harvested from a too-itchy scarf and a tweedy, wine-colored Italian wool orphan ball given to me by knitting friend Kathy. I held these two double to work the upper and the cuff.

It was magical how quickly the first boot came together. You could knit the pair in two evenings if you concentrated on your work. I took a more leisurely pace and did this pair over four evenings, including a sit and knit session on Tuesday.

Sadly, I lost track of my rows during the sit and knit. So my booties don’t match.

No matter. They are purposeful items. Good looks come second.

If I were in need of a last minute Christmas gift, this pattern could come to the rescue. Just think, with a bit of focus, I could fancy them up with different colors, stitches and possibly a pompom or two. Wouldn’t that cheer up a loved one, popping out of a Christmas stocking, on a cold and snowy Christmas morning?

Posted in quilting

Whimsical Wednesday

Lately, I have been a little too serious about my fiber and art pursuits. This realization came to me after reading the following book by Rayna Gillman.

She has been quilting and writing about quilting in the improv style for more than twenty years. I am enamored with the quilt on the cover of this book. And it reminded me about an idea I had some time ago for a playful, dare I say it, Whimsical quilt using the fabric pictured at the top of this post.

First, a little story about how I came to acquire the dog and cat print. Two years ago I was teaching fiber arts to a group of homeschooled kids. For our lesson using fabric paint, I purchased this and a few other black on white prints that were suitable for over-painting. When the students were asked to choose a fabric, no one selected this one. I was mystified. Don’t all little children love cats and dogs?

Fast forward to this year. During a fabric rummaging session, I came across the print and thought about using dogs and cats as the center patch of a log-cabin block.

How cute would this be looking out of a child’s quilt?

I decided to pair it with this print, giving me the project’s color scheme.

So last week I got busy cutting strips of many colors, stripes, prints, dots, etcetera. The more I cut, the happier I felt.

I followed Rayna Gillman’s general suggestions for sewing the strips into sets.

…….and then cutting them up and sewing them to background fabric. After a few hours of stitching, cutting and stitching some more, I had my prototype block.

A little dog in his house under a peaked roof.

The working title for this project is “Dog House, Cat Barn, Animal Friends.” In addition to dog house blocks, I intend to make a block with a cat in a barn. Some of my blocks may have both animals in the centers. Who knows how far I can push this idea?

This may be the start of a jolly, fun, playful and whimsically fibery love affair.

Posted in quilting

Jackie’s Pandemic Quilt

While visiting my mom last week, she showed me this quilt, just come back from the long arm shop. She called it her Pandemic Quilt. Apparently, in order to earn that name, a quilt must be made entirely with materials you already have in your stash.

Close up of nine blocks, including Spring and Summer.

She told me that the inspiration for this improv, scrappy quilt came when she was experimenting with embroidery patterns available on her new, very fancy, baby lock machine. Take a look at the flower in the upper left corner block, above. After working this center she cut it into the shape of a pentagon. This allows for the crazy log-cabin piecing to take place. After a little experimenting, she embroidered the block centers first, made her cuts and then did the piecing. The centers include the words “Spring” and “Summer.”

The white sashing and black cornerstones give the quilt a fresh modern feel.

Good work, Mom. I love to see you get creative.

Addendum: Jackie says,

” I think this quilt is a good example of combining techniques.  The embroidery is strictly modern and surrounded by an old technique of crazy patch piecing.  A purist would hand quilt this but my old arthritic hands no longer hand quilt so it was finished on a long arm machine which is also a modern invention.  “

Posted in sewing

Making a Paintbrush Wrap

My collection of water color brushes has been growing. Every time I take a new class on line, I end up purchasing new brushes. Storing them stuffed into my water jar just doesn’t work too well anymore. So I decided to make a roll-up brush holder from my quilting left overs.

You see in the picture my fabric selections. The log cabin square was made to practice free motion quilt stitches for Under the Sea quilt. The funny tape measure fabric was left over from the journal covers I made as gifts.

Let’s get started.

First, measure your brushes. The roll needs to be long enough to hold them all and tall enough to cover up the tallest brush. I cut the backing fabric 13 inches wide and 11 inches tall. The inner piece holds the brushes. I cut this fabric 13 inches by 12 inches and folded it in half, which gave 13 inches wide by 6 inches tall.

Fabric trimmed up and ready for sewing.

Sew them together around the outside edges. Next, mark the points where you want to make dividers. This was easy and fun with the tape measure fabric!

All my stitch lines came out straight. Yay!

Make a standard quilt binding strip and apply it around the four sides.

This fabric was left over from the Arches quilt border.

That’s pretty much it!. You will want to add a cord to tie the roll shut.

For now, I just grabbed a piece of ribbon, wrapped it around the roll and tied a bow. Eventually I will get a nice cord or strap. Or maybe I will add a toggle and loop.

But for now, I am ready to paint en plein air at a moment’s notice.