Posted in quilting

Finished Object Friday – Quilting

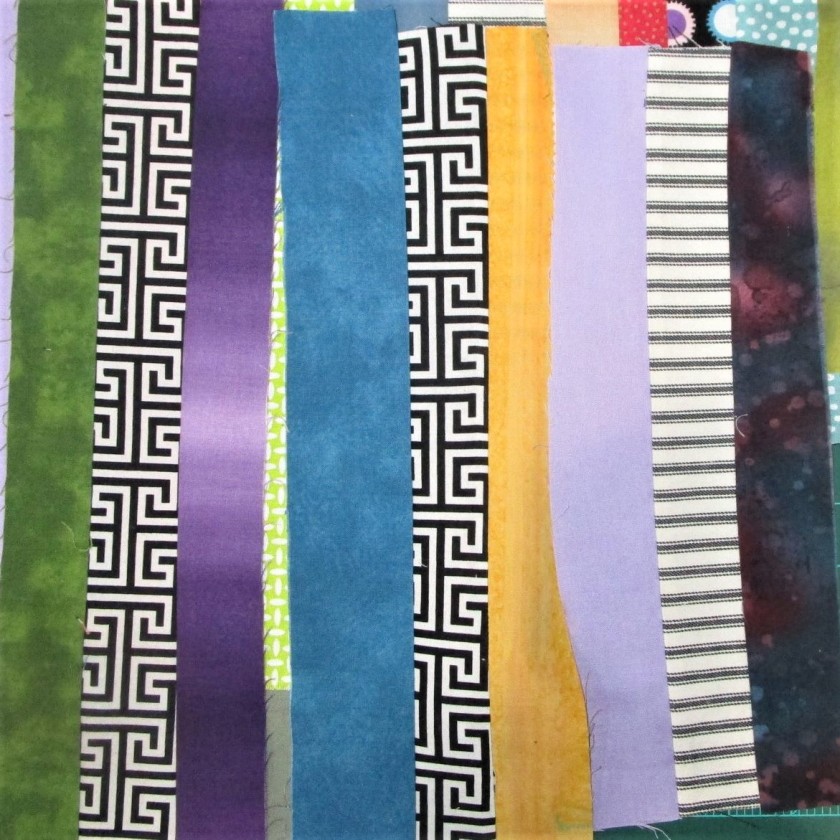
After three months, I have finished the pet-friendly quilt that started with this fabric.

Inspired by Rayna Gillman’s improvisational piecing technique and using a combination of log cabin and strip pieced squares, I designed a pair of blocks I call Dog House, Cat Barn.

The blocks finish at 12 inches square. But how can they turn into a bed quilt? After mulling it over for awhile and making several sketches on graph paper, I found that I could fit four blocks across five rows to come up with a twin-size quilt. To create balance, I staggered the rows by four inches with a spacing strip, alternating between left side and right side every row.

I also felt that the balance would improve if the center row was different. Thus was conceived the Pet Condo construction project in “mid-town,” (if you will permit my flight of fancy.)

Four inches of sashing in a grey polka-dot fabric between the rows made a “street,” giving the animal neighbors a nice boulevard for walking over to visit. With my concept complete, I re-named the quilt Animal Friends.

Oh, another group of animal friends were introduced via the background fabric: Our hardworking and very dear bees.

The Animal Friends quilt measures 57 by 84 inches. It was quilted with a combination of walking foot “stitch in the ditch” and free motion stitching on my Bernina.

Posted in quilting

Yesterday’s Work

In this post, I am continuing work on the Animal Friends quilt project. Yesterday afternoon was occupied with sewing together many strips that I have cut. They were sewn into two groups:

Three Across
Four Across

I also made another block. This one features a cat sitting in the hayloft of a barn.

For the weekend, I will continue making blocks by grabbing an animal square and a strip set randomly, then doing my best to make blocks that amuse me.

I think this will be a good activity for what may be a cold and (possibly) snowy weekend.

Posted in painting, quilting

Scrappy Sunset

I am having issues with realism. It’s not what you’re thinking. This isn’t about reality. I have a firm grip on my personal reality, and also on the wider reality of life in the dysfunctional 21st century. No, it’s about trying to portray realistic images in my artwork. My dissatisfaction began to grow as I learned to paint with watercolor. All the instruction I have received so far focuses on rendering what I see in the real world. Specifically, I’m taught, how to paint in a manner that emulates three dimensions of shapes in the real world. It’s not going well. And now my dissatisfaction with painting has spilled over into my work with fiber, leading to a muted feeling about all my work.

When I began to experiment with fiber, I was inspired by the work of Gustav Klimt. Klimt began his training in applied arts. This influence shows in his paintings,which are filled with decorative surfaces. It’s the opposite direction of realism. He takes the human form and renders it as a surface, with delicate textural coloration. The rest of his canvas is bursting with a riot of color and pattern.

https://en.wikipedia.org/wiki/Gustav_Klimt

It is time for me to return to my first impulse about fiber art and make an abstract work. I’ve chosen a sunset as my subject. This photograph is one I took about a year ago during one of our trips to Wisconsin. My intention is to boil the sunset down to its essential lines and colors, sew strips to a backing fabric and then apply decorative stitches. I’ll use hand-painted scraps of cloth leftover from other projects.

I started out by making a rendering in crayon, placing an emphasis on the angular lines.

After working out the number of strips I will need, I scaled up the image to size, which will be 18 by 12. Next I assembled the fabrics.

I realized that I will need to paint a few more pieces to have enough grayish purple for all the clouds in the scene. So I found a few white and gray scraps that will be painted.

I also made a pattern in full size on butcher paper. I don’t have a photo of it for you, and it has already been cut up. As I made the pattern, I winnowed down the detail even further to get to the essential lines of the sunset. I am using muslin as a backing fabric. Work will proceed from the most complex strip (the sun) outward, first down and then up. After a few hours, I had the lower half assembled.

After getting to this stage, I felt a palpable sense of relief.

Tomorrow I will finish painting the fabric and assemble the rest of the piece.

Posted in quilting, recycling

Addressing UFO Sewn Objects

Six months into my adventures with Daily Fiber Fun, I find myself surrounded by a bunch of Unfinished Objects. Here they sit, silently reproaching me for leaving them in a partial state of completion: unfinished, unused, unloved.

Resolved to address the cries, I have selected this guy to work up into an FO.

I made this 21 inch square block of hexagons during my week of learning to piece angular shapes. The teacher behind my success is Joanna Figueroa and her class on Bluprint, “Smarter Strip Quilting.” Since I had a bunch of fabric left, I turned to Joanna’s class again for another lesson. This time, I used the same type of piece – a 60 degree triangle, but cut in a way that makes diamonds.

I reasoned that this shape would work nicely with the hexagons as the back side of a large sofa cushion (!) After sewing and cutting many 1/2 diamonds, I came up with an arrangement that ignores the diamond shape (!) I’m going with chevrons instead.

Five columns of diamond shapes, roughly 21″ wide.

Skills that I learned in class the first time helped me speed through any little technical difficulties encountered while making this block.

Nesting the seam allowances together makes it a breeze to match points.

That said, it still took me the better part of Sunday and Monday to make.

I added white triangles to balance and fill the chevron ends.

The next step is quilting. There was so much going on in the chevron block, I decided not to risk messing it up with bad machine quilting. But I did choose to quilt the hexes, using parallel and dot to dot machine quilting technique.

I Love the red cotton thread.

Now to construct the pillow: I recycled a zipper from a disassembled cushion and a king-sized feather pillow which had got slightly mashed over the years. After I squared up the two blocks, the zipper was inserted into a side seam and the four sides sewn together. Using 1/2 inch seams and zig-zagging the seam allowances make it sturdier. Here is the completed pillow, resting peacefully on my sofa:

And here it is showing the chevron side:

Which side do you like better?

A big shout-out to Joanna Figueroa. You can find her class here: https://shop.mybluprint.com/quilting/classes/smarter-strip-quilting/40436?utm_expid=45q-ktsMT9eh9lDyPHy43Q%3A2&utm_referrer=https%3A%2F%2Fwww.mybluprint.com%2Ftopic%2Fquilt&redirect=svodPlaylist&skipMod=true

Posted in quilting

More Piecing: Get to the Point

It is a really fine day to be in my fiber studio. The sky started out pouring with rain, and it ended up raining very hard again this afternoon. Today my goal is to practice piecing with triangles. For some reason, I find this shape way more interesting than a square or rectangle. I have been on-line viewing a wonderful tutorial by Johanna Figueroa, through BluPrint.com. You can find this lesson at https://www.mybluprint.com/playlist/5055/10267

Her first lesson is based on a Japanese block she discovered. She calls it Jelly Girl. Here is an image of her example quilt:

As you can see, it is a hexagon pattern. But inside each hex is a swirling shape made up of six triangles. The hexes are spaced apart with white equilateral triangles. She promises that it will be easy to piece together.

I have small amounts of these three fabrics, so this will be a sampler. To start the project, the fabric is cut into 2 and 1/2 inch strips, across the grain.

Next the strips are sewn together in twos. Here are my strips after pressing.

This is where the triangle part comes. Using an Omnigrid ruler that has lines for 60 degree angles, the strips are cut into equilateral triangles. For the three types of strips, I ended up with six types of triangles.

They look like Christmas trees!

Next six triangles are laid out into hexagons. Only three of the triangles are sewn together at a time. The two halves of the hexes will not be joined until the rows are sewn together.

Here are my results at the end of the day:

I love the whirligig shapes.

I also cut the white equilateral triangles, which will be used as spacers. This colorful sampler will get finished next time.