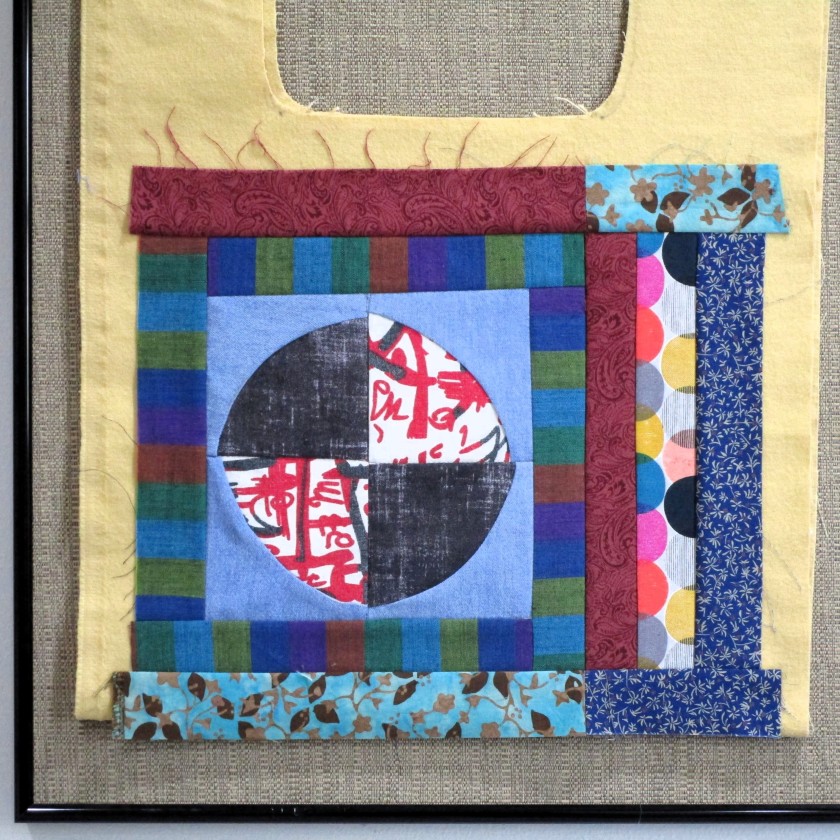
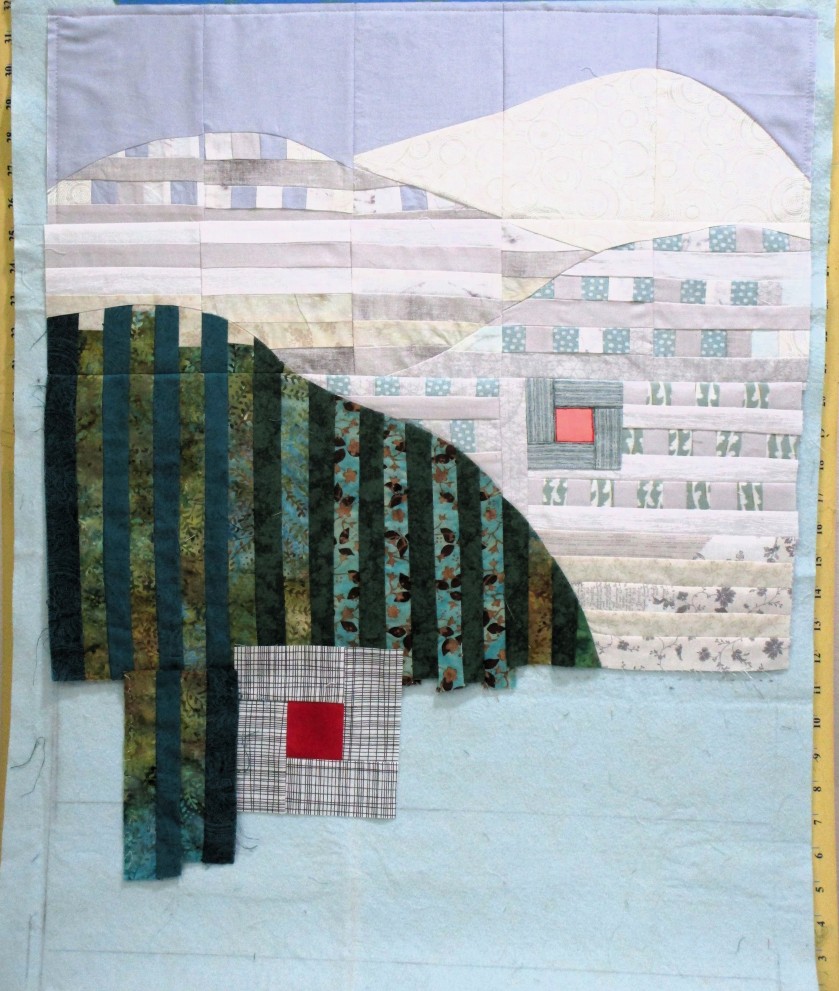
Posted in knitting

Back to my Stash: Boring Baby Yarn

It’s cast-on Monday. Having finished my latest knit project, I am ready to continue the stash reduction campaign by starting something new. The acrylic section of the stash is pretty well depleted since I finished up the Abstract Rainbow lap blanket. Left behind is a giant ball of yellow sport-weight yarn, intended for a baby blanket I suppose. I was given it along with a few bits and pieces of pale blue and pale variegated yarns. The pale yellow doesn’t inspire me.

….and there’s so much of it! The skein is about 150 grams.

But wait – I came across a pattern for a baby jacket that requires two strands held double. It is written by Franklin Habit, a designer with impeccable taste and reliable patterns. This baby jacket can be knit quickly. And it’s a free download.

But wait – what if I hold the pale blue yarn with the pale yellow yarn?

Suddenly an interesting texture and color appears. The blue is warmed by the yellow and the yellow cooled by the blue.

I like what I see, so let’s cast on.

I even see a suggestion of green emerging in the fabric.

5-Hour Baby Jacket is sized for a newborn and is knit from the top down in one piece. It is a soothing knit that makes for a peaceful morning, as copious amounts of rain fall from above. The sound of drops on the skylight is mesmerizing. Maybe I will sit here and knit all day long.

Posted in hand embroidery, recycling, sewing

Japanese Knot Bag

Having recently finished a wall quilt, I found myself with various pieces of fabrics left over. Instead of stuffing them into a box and shoving the box under a bed, I decided to cut the fabric into strips for the purpose of sewing them into a project bag.

Back two years ago, I became interested in the Japanese art of stitching, aka sashiko and boro stitching. There was a pattern for a knot bag in this book by the Shibaguyz.

I did a post about it on Jan 5, 2022.

To make the bag, I would need fabrics for the base and lining, along with my strips of fabric. Fortunately, I had both. My daughter gave me some yardage of sturdy cotton flannel and my friend and co-worker Scott Perkins gave me a sample of raw silk.

Here is what I came up with using one quilt block made of a circle in a square. I then sewed strips of fabrics around it to cover all of the base and raw edges.

Side One
Side Two

Fabric selection included bits of three men’s shirts. (The dark red and dark green strips, and the blue chambray behind the first circle.) All three of these fabrics had been worked into the Shell Lake Story quilt. So, I am using scraps of scraps!

My next step was to sew up a lining using the same pattern as the base.

A cellphone pocket in the lining.

Adding the hand stitching took a few weeks. I marked all the stitch lines with a chalk pencil. Using white Sashiko thread I worked a running stitch in straight lines on the strips and circles around the circles.

And here is the front and back of the bag after all the top stitching is in place.

Finally, the seams of bag and lining are sewn up, the bag inserted into the lining with right sides facing and the U-shaped top edges are sewn together. This last step took me two tries, btw, so seam ripping happened.

Turning the bag to the outside, the only remaining steps were to close the strap side seams and top-stitch the opening.

To use the bag, the long handle is threaded through the short handle.

A quick look at the lining before it is turned to the inside. I love the look of the silk, and it is pretty easy to handle. Fraying was the only thing that gave me some trouble. The next time I sew with silk, I will zigzag the seam allowances

Here is the completed knot bag, filled with a knitting project.

Front of bag as it hangs from a coat rack.

Back of bag.

This project was great fun (except for the seam ripping) and I would enjoy making more of these nifty bags. A larger size would be handy for bigger projects. And what a good way to use up scraps.

Posted in knitting

Finished Object: It’s been a minute

It just now occurred to me that I cast on this stash-busting brioche stitch hat more than a month ago. Time to show the final product.

In my first post about the project, I noted that working brioche stitch was quite new to me. I elected to knit this little beanie because it was advertised as an easy pattern for beginners.

Yes it was. But I still made mistakes. Notably, every time that I knit back to the beginning of a round, I became confounded when picking up the second color and starting the next round. Consequently, I have some weird-looking contrast color bars across main color stitches in some rounds.

Thankfully, they are visible only on the inside of the beanie. (not shown in the photo……..why advertise one’s mistakes?) So I don’t recommend that the hat be worn flipped to the reverse side. Trust me on this.

On the plus side…..

  • It is very soft and squishy
  • It is comfortable
  • It will probably be very warm on a cold day.

On the down side……..

  • It is pretty loose on the head.
  • It shouldn’ be worn on a windy day
  • It probably doesn’t match your school colors.

Winter is quickly drawing to a close. Despite the fact that Spring is my favorite season, I’m a little sad to see Winter go. I’ll be taking a pause on knitting warm accessories for the hot months ahead.

What’s next in store for my yarn stash? I’ll take stock of what sort of fiber is left and see what I can craft out of the much-shrunken remaining inventory.

Posted in knitting

Cast-on Monday: Brioche Beanie from stash

On the advice of Kathryn who posts as Backstage Knits, I am knitting a beanie as my first project using brioche stitch.

I’m using two orphan skeins. The red is a superwash wool by Lambs Pride. The grey is the natural alpaca and wool worsted leftover from Henry’s Biome hat.

So far, this seems to be a swift knit. I am making the odd mistake here and there, which slows me down as I re-knit part of a row. But surely and steadily I am getting the hang of brioche.

I’m hoping to take this project as a travel knit on an upcoming trip. But I may have it finished before we depart.

The pattern is Brioche Basic Beanie by Marilyn Bracketer and it is available for free as a download from Ravelry. 

Posted in knitting

Friday Finish: Adult Balaclava

Here is a follow-up on one of my recent stash-busting projects. My first balaclava was for grand-daughter Lu and was ALL stash-buster.

https://dailyfiberfun.com/2023/08/18/friday-finish-child-balaclava/

This version actually required new yarn. My daughter wanted one, and her color requirements were vastly different from her daughter’s (no surprise there.)

It is a pure coincidence that the colors my daughter chose are nearly identical to the ones used by designer Gretchen Tracy in her pattern post on Ravelry.

https://www.ravelry.com/patterns/library/kids-dice-check-balaclava

If you would really like to make yourself one of these cold-busting head coverings, I recommend that you knit the child’s version first. For the adult version, I made at least three modifications that will adjust the size. My number of cast-on stitches and my gauge were the same as the pattern. I lengthened the rectangular crown piece to 7 and 1/2 inches and the length before joining in the round to 10 inches, (center of head to chin.) I also made the neck section and cast-off ribbing longer, but you can try the piece on while in process to get the neck edge to your liking.

The gold yarn is Malabrigo Rios. The white is KnitPicks Hawthorne DK in bare and Swish DK in rainforest heather.