Today I finished up my practice sample for the Duckweed fiber object. This involved making the quilt sandwich and quilting.
I started with the walking foot and black thread. The stitching included wavy lines over the foreground and sewing around the duck. Next I switched to white thread and the free motion foot for creating the ripples around the base of the duck and outlining the duck’s wing feathers. I continued on my making white ripples to match the black ones in the foreground. To finish up, I used yellow-green thread to quilt the background.
As I worked, I began to like it more and more.
For the purpose of comparison, here is the inspiration photo.
And here is a close-up of my duck.
Making this piece was really good practice. I might do some things a little bit differently when I begin work on the main piece. I’ll give this project a few days rest and come back to it with fresh eyes.
My collection of water color brushes has been growing. Every time I take a new class on line, I end up purchasing new brushes. Storing them stuffed into my water jar just doesn’t work too well anymore. So I decided to make a roll-up brush holder from my quilting left overs.
You see in the picture my fabric selections. The log cabin square was made to practice free motion quilt stitches for Under the Sea quilt. The funny tape measure fabric was left over from the journal covers I made as gifts.
Let’s get started.
First, measure your brushes. The roll needs to be long enough to hold them all and tall enough to cover up the tallest brush. I cut the backing fabric 13 inches wide and 11 inches tall. The inner piece holds the brushes. I cut this fabric 13 inches by 12 inches and folded it in half, which gave 13 inches wide by 6 inches tall.
Fabric trimmed up and ready for sewing.
Sew them together around the outside edges. Next, mark the points where you want to make dividers. This was easy and fun with the tape measure fabric!
All my stitch lines came out straight. Yay!
Make a standard quilt binding strip and apply it around the four sides.
This fabric was left over from the Arches quilt border.
That’s pretty much it!. You will want to add a cord to tie the roll shut.
For now, I just grabbed a piece of ribbon, wrapped it around the roll and tied a bow. Eventually I will get a nice cord or strap. Or maybe I will add a toggle and loop.
But for now, I am ready to paint en plein air at a moment’s notice.
As many of you are doing right now, I also am looking back at my work in 2019 for the purpose of choosing favorites. It was an interesting exercise. I especially was surprised when comparing the difference between most popular projects and my own favorite projects. They didn’t always match up. Here are the top picks in each discipline.
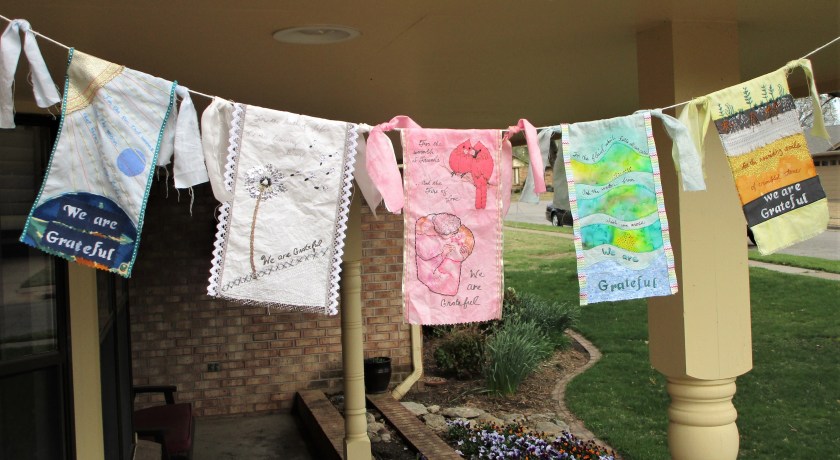
1. Embroidery: Prayer Flags.
This fiber object was actually a mixed media work, including the crafts of painting and applique. But embroidery was the new skill that I was practicing and I was thrilled with the results.
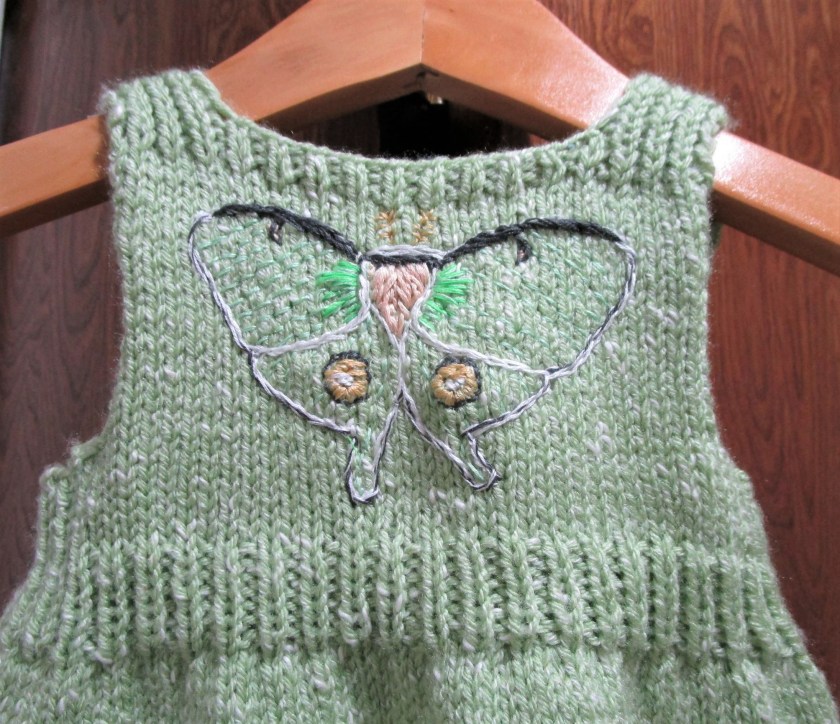
2. Knitting: Luna Moth Baby Dress.
Starting with some yarn purchased the prior year and a design of my own featuring a ruffled hem, this project morphed into something special when I discovered a Luna moth resting on a blade of grass in my backyard. She looked so much like the dress I was knitting that I decided to embroider her image on the back.
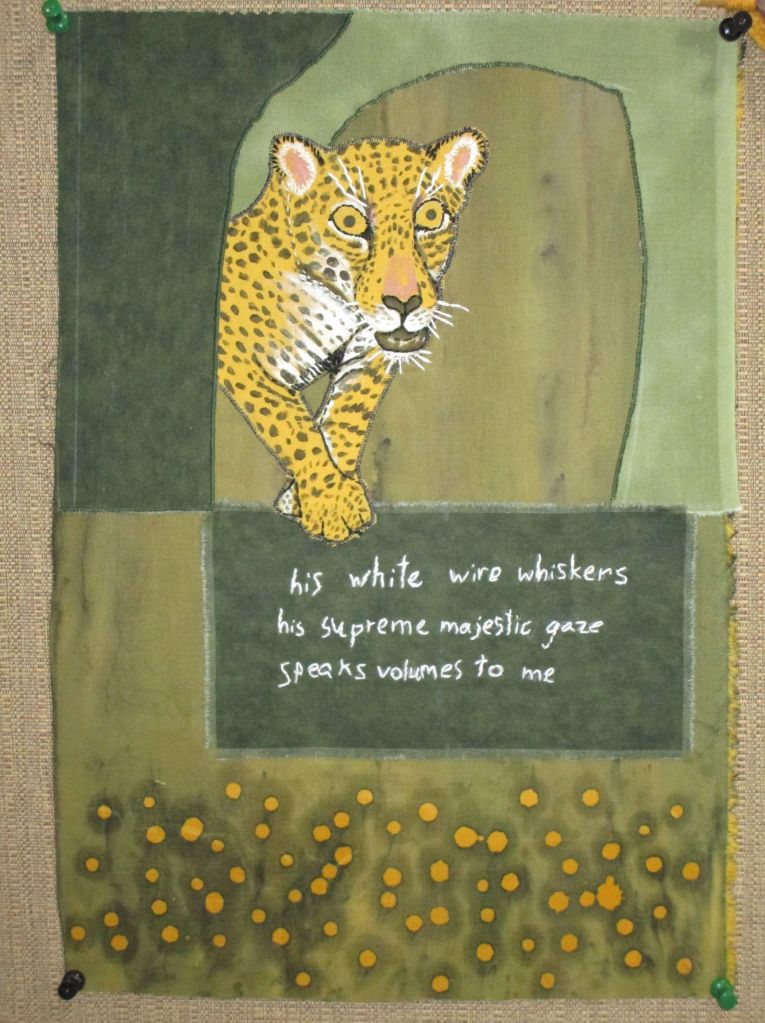
3. Mixed Media: Henry’s Haiku
When my grandson handed me this little poem, I felt that it was special. To illustrate it, I chose an image of a jaguar which I painted and embroidered. The background fabric is treated with candle wax drips and overpainted. I embroidered the poem so as to match the author’s handwriting as closely as possible.
4. Drawing: Overgrown Garden Shed.
While not my favorite sketch, this one received the most likes and comments. All of these skills were new to me, especially using ink wash and brush pen.
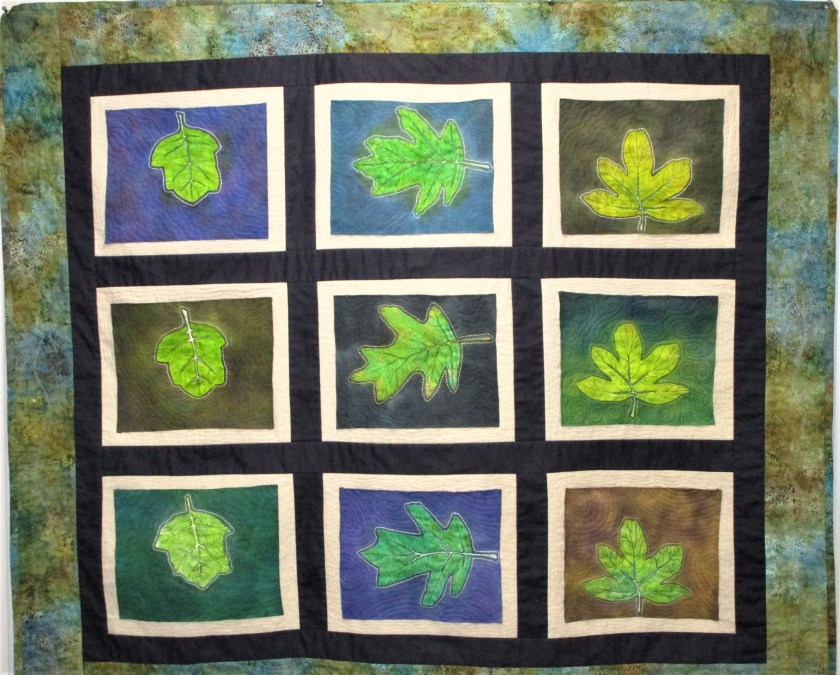
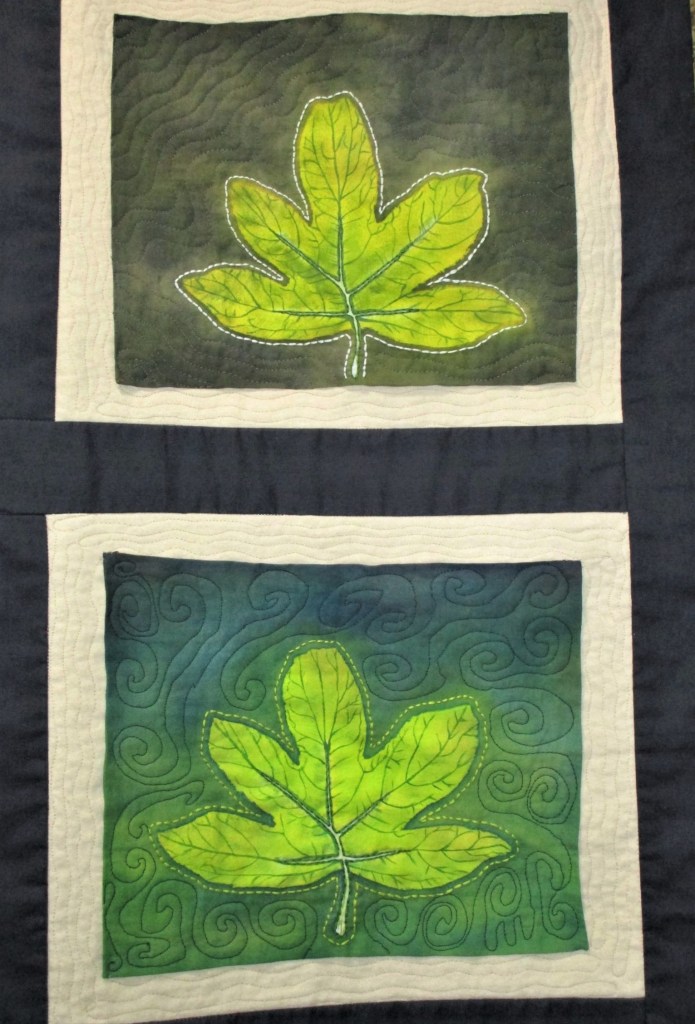
5. Quilting: Oakleaf Hydrangea Study
Every day is a happy one, when I see this quilt in the morning light. New skills included working with resist and free-motion quilting.
6. And finally: Crochet: Purple Yogi.
This object is so silly, and yet it turned out to be the most popular by far. Perhaps I had accidently connected with the current Zietgeist. The doll has florist wire bones so that it can bend and twist as needed to strike a post.
Happy New Year to all, and may 2020 bring you your most creative work.
As I knotted off the last thread of the binding’s slip stitch, I drew my quilt around me and snuggled down into its folds. It is wrong to be in love with one’s own work?
This little lap quilt turned out very much the way I had hoped it would. The dark sashing focuses one’ eye on the beautiful leaves, as if each was a boxed jewel. I loved quilting in free-motion over under and around the leaf shapes.
The batik fabric of the border matches many colors in the blocks. And the botanical pattern on it suggests the sort of wooded area where one might find an oakleaf hydrangea shrub in the wild.
“Oakleaf Hydrangea Study” Hand painted cotton, cotton flannel, and commercial printed fabric; hand embroidered and machine quilted free motion style.
I have been sewing like a mad woman, trying to finish the Oakleaf Hydrangea quilt. It’s very close to finish now – needing only the binding sewn on. I ran out of thread yesterday just as I was finishing quilting. So today, I am giving that project a rest to celebrate the change of seasons.
For the first day of autumn, I am making a block using a technique that I haven’t tried yet: reverse applique. My idea is to do a tree silhouette, with negative and positive images of each tree half. When describing this to my husband, he came up with the idea of making each side equal – to acknowledge that the first day of fall has day and night of equal length. I agreed and got to work on a sketch.
I chose a charcoal gray fabric to make the reverse portion of the image. Here is it, all cut up and smeared with glue.
My background fabric will be a gold print, to represent the forest in fall. Here is the positive image glued to the background and the final block with both images in place.
The other pattern I wanted to try is the Maple Leaf. I have seen really pretty quilts made in this pattern. I plan to use up left over hand painted fabric from the hydrangea quilt as the background color.
Green for the background and orange for the maple leaves.
I found instructions for this pattern on The Spruce Crafts website, by Janet Wickell. Maple Leaf is an exercise in half square triangle construction. Here are the stem pieces, made with one orange and two small green.
Okay, I didn’t takes pictures of every step in constructing the remaining squares. Basically, you make four half square triangles in the two different colors, then combine one solid background, three solid leaf color squares, the stem and four half triangles to make each block. I made two blocks. Here is the finished object.
I will add some stitching on the tree square, and perhaps quilt a bit on other parts of this work. But right now I am off to buy more thread.
Janet Wickell’s site and instructions for the maple leaf pattern are found here: