Posted in embellishing, painting, quilting

Friday Finish: Creation Wall Quilt

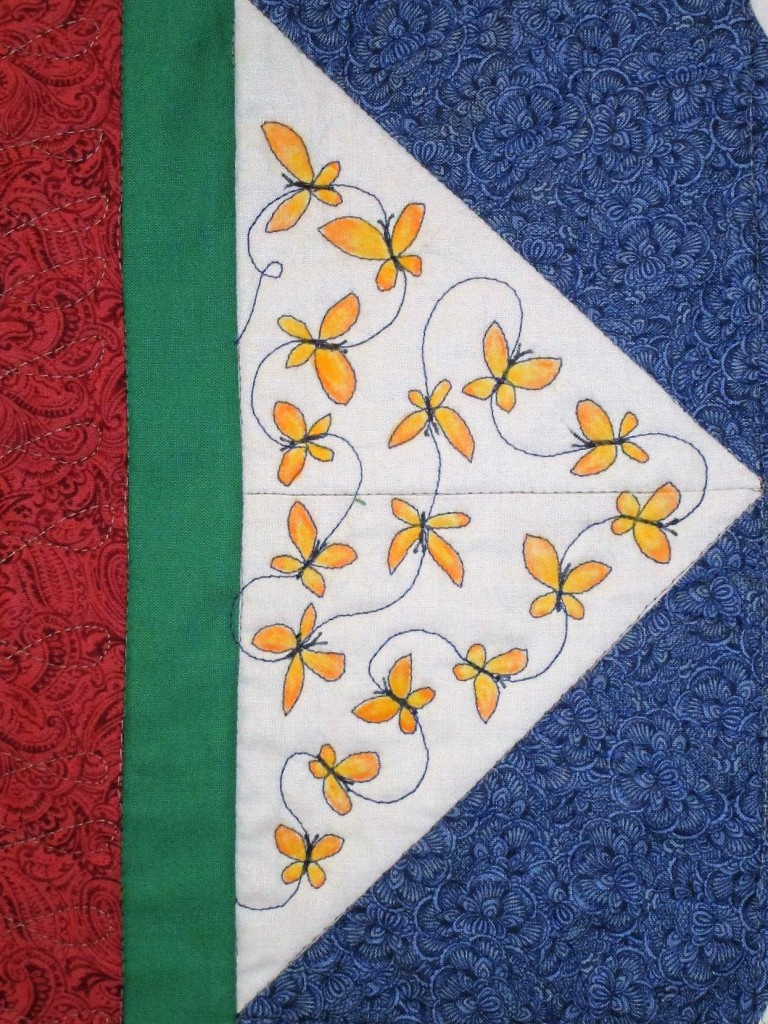
Today I’m showing the finished wall hanging that I made based on a 13th century illuminated manuscript. The project got its start when I wanted to try out my new watercolor pencils on fabric. This link shows the original artwork that inspired me.

After getting the blocks sewn together, I quilted the sections in a dark blue thread. I was proud that my free-motion quilting skills were proficient enough to make swirls, wiggles, spirals, shapes and lettering.

Most of the fancy stitches were done on the pale grey fabric. In each of the four cardinal compass points, I stitched images that were in the style of those found on the medieval manuscripts. That style is typified by drawings of flowers, animals and figures worked into lots of filigree lines. I love the flat imagery and the primary colors used by the artists of the time. They were simple monks living a simple life.

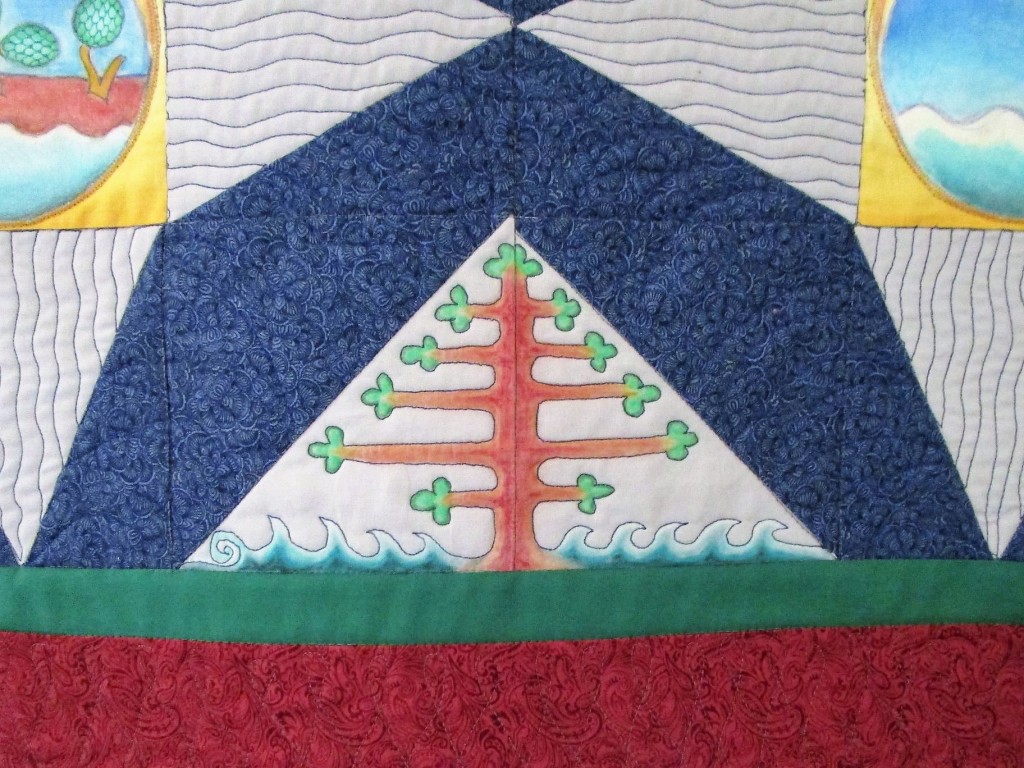
The giant focal point, God’s eye, is sewn with spirals: symbol of the cycle of Life.

This quilt done, I can now focus my time on the Stay-at-Home round robin quilt. Right now I’m working diligently on a large number of flying geese blocks. If I stick to it, the border will be finished in time to post to the Linky party before it closes.

Posted in painting

Watercolor Plus Wednesday

It’s Wednesday, it’s time for a watercolor painting but…….

I had to test out my Christmas gift from Bill.

He’s the kind of guy that loves Christmas gift giving. So this is a BIG box of watercolor pencils. The first thing I had to do was make a swatch.

I spent a lot of time on Christmas afternoon making this swatch. First of all, the pencils weren’t in a usable order, so I had to re-arrange them. There were three steps. 1. Write out the color numbers and names in the same order that they lay in the trays. 2. Scribble each pencil. 3. Liquify each swatch with water to reveal the color.

For my first painting with these pencils, I chose a photograph by Bill of a cardinal.

I love this image, because of the light. He must have taken this one late in the day.

After making a sketch, I laid down an initial watercolor wash. Then I selected about a dozen watercolor pencils which seemed to match all the hues of the bird. I blended these on the sketch then stroked over with water to liquify the pigment. After it dried, I added black details and white highlights with paint.

At that point, it was obvious to me that the background was too pale. I deepened the shades using Payne’s gray and a little burnt sienna.

Side-Lit Cardinal

I’m pretty happy with the result. I think that I will try some floral subjects next.

Posted in embellishing, hand embroidery

More Improvised Embroidery

Today I wanted another shot at embroidery on a watercolor painting.

I came up with a fantasy-like, pre-historic plant form.

Here are the stages of the work.

Tentative shapes, in two colors of thread.
Expanding on the theme.
Completed the thought. Added a few underlines.

Am I done now?

Just had to add a little more paint.

What do you think? Did I go too far? Or not far enough.

It could have been worse. I considered adding beads.

At least the activity was relaxing and restorative.

Posted in embellishing

Embroidery Experiment

Today I have for you two little paintings with a little something extra. After the paint dried, I worked some embroidery stitches into the design

Two Pansies:

Two Pansies with embroidered faces.

Test paper with additional glazes added. Semi-abstract.

Same painting embroidered with fly stitch.

The second painting was extra fun. I used a variegated cotton thread by Sulky. The thread was held double.

What fun stuff are you making today?

Posted in painting

Agate Painting Revisited

On Sunday I returned to work on the Agate still life watercolor begun in January. (I’ve developed a habit of setting aside partially finished paintings and I’m making a promise to myself to stop doing this.) Here is my last posting:

https://wordpress.com/post/dailyfiberfun.wordpress.com/4678

And here is the finished painting.

I found it very soothing to build up the various rings with glazes using matching and contrasting colors. To add more texture, I applied salt to the wet paint in places. After it had dried, I scribbled with a black Prismacolor pencil on the outer layer and darkened some of the rings. To finish, I flecked on spots of copper metallic paint using a toothbrush.

Paints included raw sienna, burnt sienna, quinacridone red, Payne’s gray, cerulean blue and Prussian blue.

The reference photo is found on Pixel and was sourced from the Natural History Museum of London.

https://pixels.com/art/natural+history+museum+london+agate