Posted in drawing

Lino-Cut Fun

On Sunday I posted the sketches that I did in anticipation of a print-making class I was planning to attend. Today I’m showing the fun stuff I made at that class.

The instructor, Justine Cherwick, was quiet, modest and thoroughly prepared. She started us off with a circle-in-a-rectangle design for practice. Each quadrant was carved in a different design.

Stamp and Print

That was quite easy and very satisfying. Next, Justine transposed our initials in reverse on a blank block and we carved stamps of them.

So far, so good. For our third exercise, we each selected from a group of Halloween designs to carve a 3 x 4 block. I loved this cat with a skull and sickle.

The stray faint lines and dots you see around the edges of the main design are called “noise.” Some artists like this effect, others not-so-much. It’s easy to carve them off after you’ve done your test print.

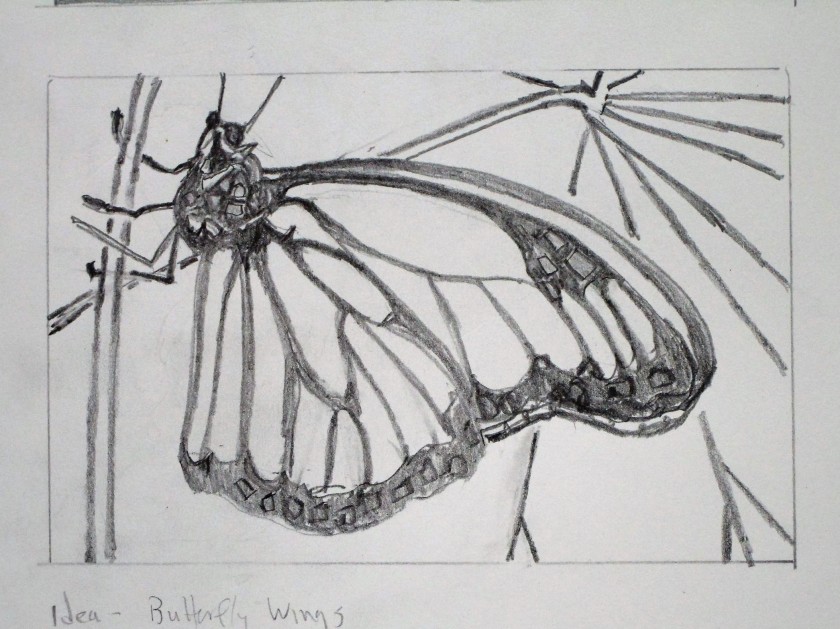
And now for the big finale. I chose to carve the beach scene. Here is my sketch.

You will have to imagine that the dark marks will become white and the white background will print black. Here is my finished block.

And my print.

For a first try, it’s not too bad. Good enough to encourage me to try making more lino-cut work.

And finally, here are the Halloween postcards I printed and sent to the grandkids.

Dressed up with some echo lines.
A touch of orange and a barbed wire border
Posted in drawing

Sunday Sketches

I spent some time this week-end preparing for a class in printmaking. This will be an introductory class for me, since I’ve had no previous training in the art. After dreaming up a few ideas for print images, I started sketching them out. Here’s what I came up with in the space of a few hours.

To start, I went to my photographs of Belize for inspiration. Here is one that I snapped of the beach as seen from our front porch. The view faces east and the time is shortly after sunrise.

Nice, huh? The tree and hammock are silhouetted against the water and sky, so I made them the primary subjects. Keeping in mind my inexperience with carving a print block I vastly simplified the scene. I also chose to reverse the tones and turn day into a night with the moon rising.

Next I went through previous saved photographs. This is one of a monarch butterfly I downloaded from a free use site. I was attracted by the strong contrast of its black body and wing edges with the warm background

For my third sketch I worked from my imagination. I wanted to play with a basketweave pattern, but in an unusual context. The idea of a cloak came to mind.

The class took place yesterday. It went well and I had a great time. I’ll show you the subject I chose and the block and print I made in the next post.

Posted in colorwork, hand embroidery, knitting, sewing

108 Contemporary Gallery

During a shopping excursion to Tulsa, we stopped by the 108 Contemporary Gallery to catch a new show – State of Craft. Works in various media, including fiber, were on display. I thought it would be good to check it out.

There were some large works such as this one by Whitney Fortsyth.

All Things New – Ceramic with oil patina

Interesting wood items like this one by Rusty Johnson.

If you could see the Wind, driftwood and colored pencil

And then there were fiber objects, mostly smaller but exquisite.

Let it Flow, Sheryl Landis, dyed silk, embroidery, paint and beads.

A large work with a fish-eye mirror in the center. White linen with beads.

I particularly like these bags by Rhonda Steiner, hand dyed, painted, and screen printed.

And finally, there were some yarn objects, felted, crocheted and knitted.

Here is a link to the gallery, in case you would like to see more. https://108contemporary.org/event/state-of-craft-2019/

Posted in colorwork

Experiment with stamping

While shopping yesterday, I discovered some fabric ink pads seriously discounted.

This is something I have been wanting to try for some time. I have done a little bit of stamping/printing using fabric paints and homemade stamps. I’ve never been quite satisfied with the process and medium. The fabric paints start to dry and clump before I have finished my project. This results in a lot of wasted paint. So I am intrigued to try stamping with ink instead.

First I made a color swatch using some square stamps.

I like the red, blue, green and magenta the best. When stamping yellow over blue, I noticed that the inks blended – a desirable trait for my work.

The instructions say to let dry 24 hours and then press for 3-5 minutes to set the ink. This morning when I pressed the samples, I noticed that they weren’t quite dry. But by this afternoon they seemed okay. I quickly made up some triangle stamps out of foam pieces with the idea of stamping an angular rainbow on white fabric.

This was fun.

Next I tried the ink on a pale gray printed fabric. While my stamping technique was a little crude, I thought that the result was okay.

My verdict: I’m glad that I paid so little for these ink pads. It took a lot of color worked onto the stamp for each press, and the color intensity on the fabric was lacking. I’m also not thrilled that it takes so long to dry. Do any of my fiber arts friends have a product that you would recommend?

Posted in hand embroidery, painting

Hydrangea in my Rearview Mirror

Before I say farewell to my study of the oakleaf hydrangea plant, I want to share the little study I made of the blooms. Above is a reference photo for the plant. The “flowers” open pure white, changing over times into shades of rose, rust and green. I say flowers in quotes, because the part of plant that most people identify as a flower – it has petals, after all – is really a bract, or sterile flower. The real flowers are in the tight little buds that you see at the top of the panicle. Here is a specimen, much dried up, that I took from my hydrangea.

Interestingly, there are some bracts with four petals and some with five. I did a drawing in colored pencil before I started making the fiber object, which depicts the rusty pink color of late summer.

My first thought was to make corner blocks for my quilt with images of the flower panicles. But after I had assembled the quilt and laid out the border, I decided corner blocks would not improve the quilt at all and might even detract from the focus. By then I had already started a sample block.

It is a sweet little object, just 4 by 4 inches. Made with hand painted cotton, block printed and embroidered. Perhaps I can use it in another project.