Posted in colorwork, knitting

Hat Alert!

The message came in over the week-end, with a tone of some urgency. It seems that the baby toddler girl had outgrown her hats, and the carefully saved wool hat of #1 grandchild was no where to be found. With the onset of cold weather, there was no time to waste in meeting the need.

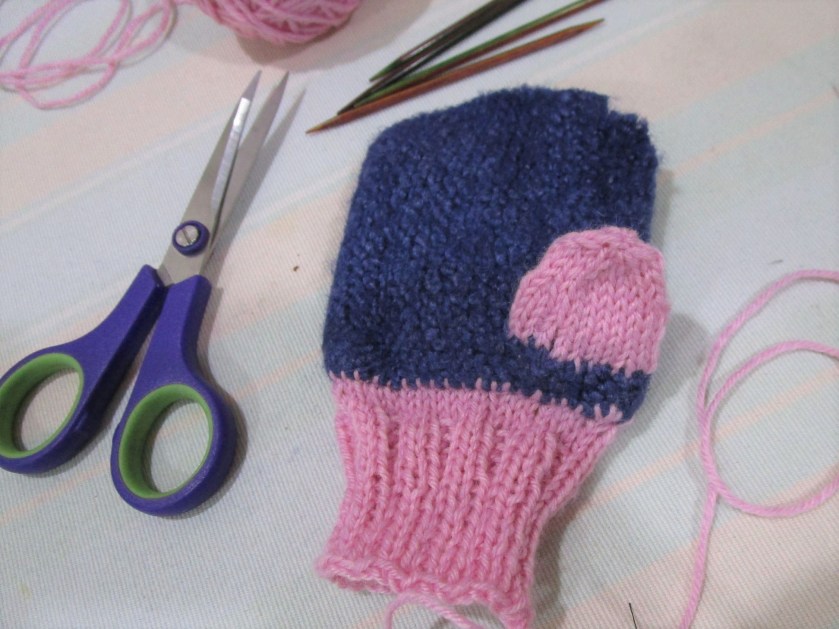
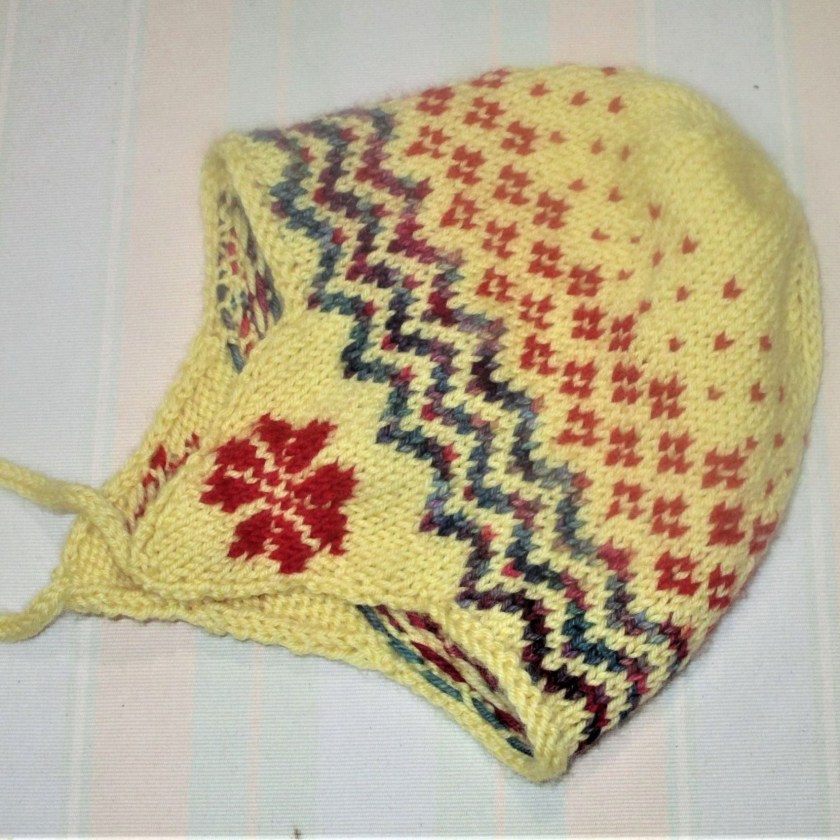
The criteria was pretty simple. Earflaps were desired and a cord to tie the hat under the chin. Consulting my stash I found an almost full ball of Cascade 220 Superwash in a pale yellow color. I had purchased this yarn two years ago when I first learned of the baby’s expected arrival. I was excited to try out some stranded patterns using this yarn and various bits and bobs left over from other projects.

First I consulted my knitting stitch dictionary (750 Knitting Stitches – The Ultimate Knitting Bible.) For this project I needed a pattern with a fairly short repeat. I also needed a motif that would fit on the ear flaps.

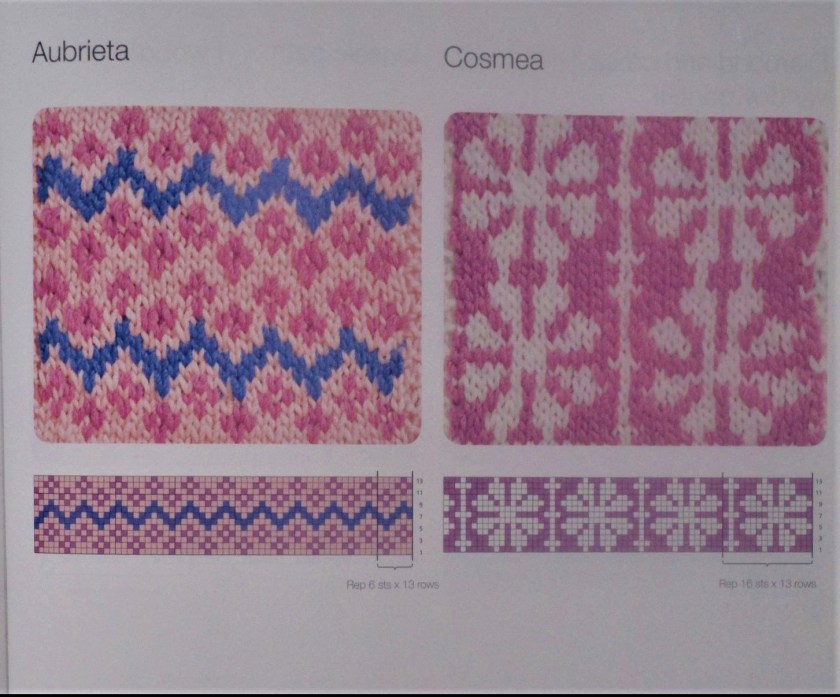
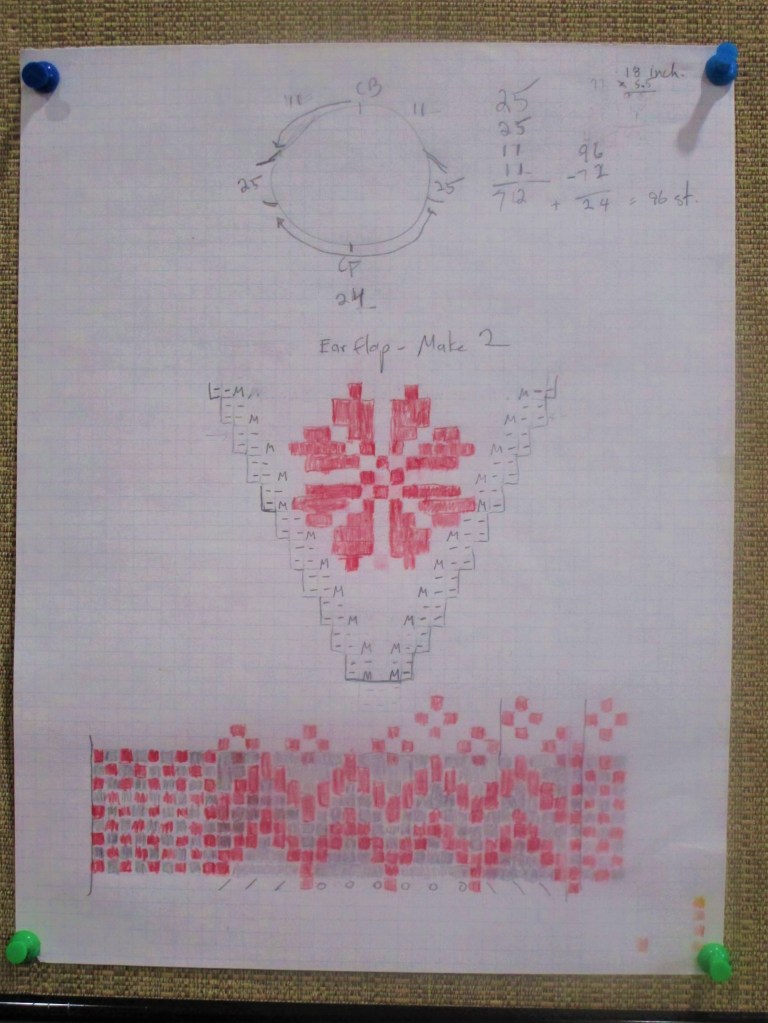
These two will do nicely. Cosmea will work for the earflaps and Aubrieta can circle the body of the hat. I also liked that the pattern repeat was six stitches. With my gauge of 5.5 stitches, a multiple of six will help me achieve the 18 inch diameter I needed. Here is my chart for the earflap and body, and my calculation for the cast on. I came up with a total of 96 stitches, which is divisible by six.
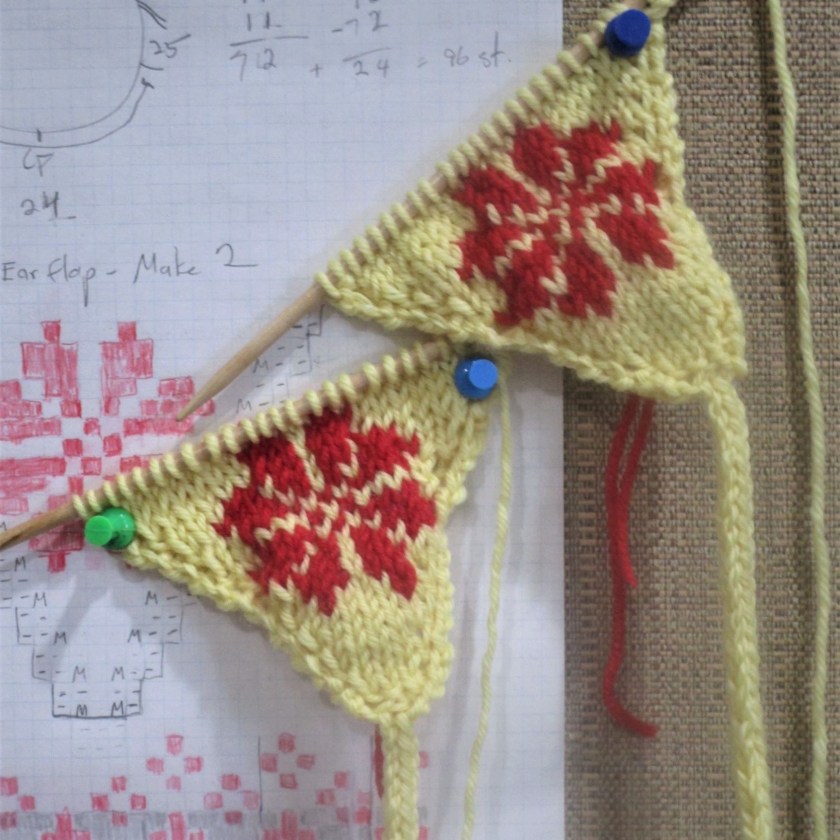
Ear Flaps done.

After casting on, I completed a modified version of Aubrieta, stopping when the hat body was 4 and 3/4 inches tall from cast on. Next I consulted the pattern I had used ten years ago for grandchild #1’s hat to figure out the crown decrease rate. I added a few rows of dots in the first three rounds of decrease, then completed the rest of the decrease in the solid yellow yarn.

Ear Flap hat in the blocking stage.
All Done.

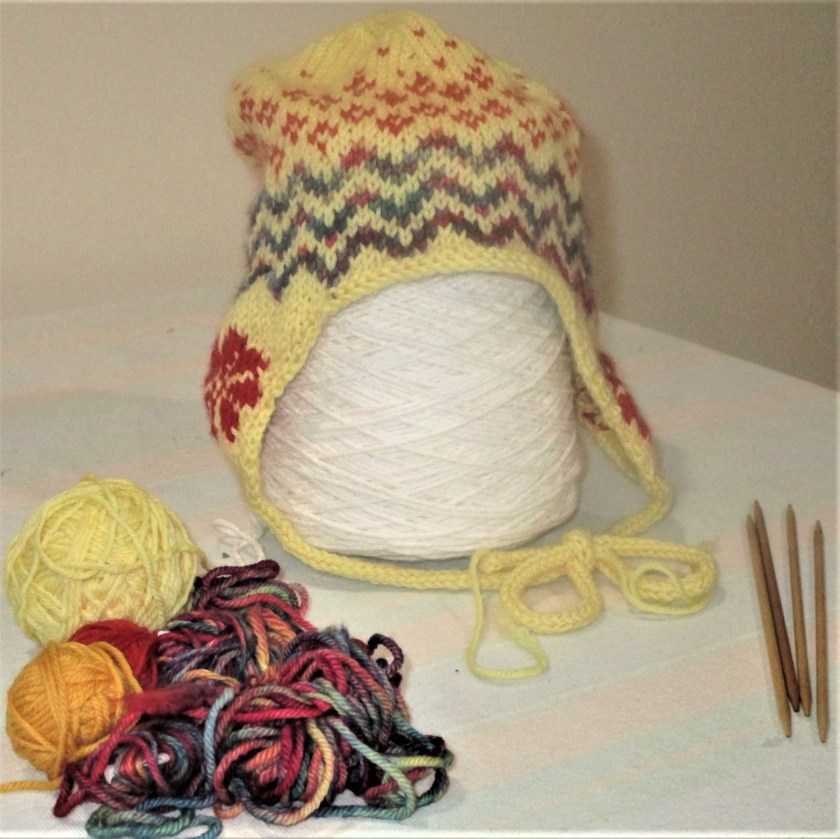
This was a fun and quick project to make from one’s stash. I was pleased that I could use up some yarn scraps of a beautiful Malibrigo yarn that was left over from my blue ribbon vest.

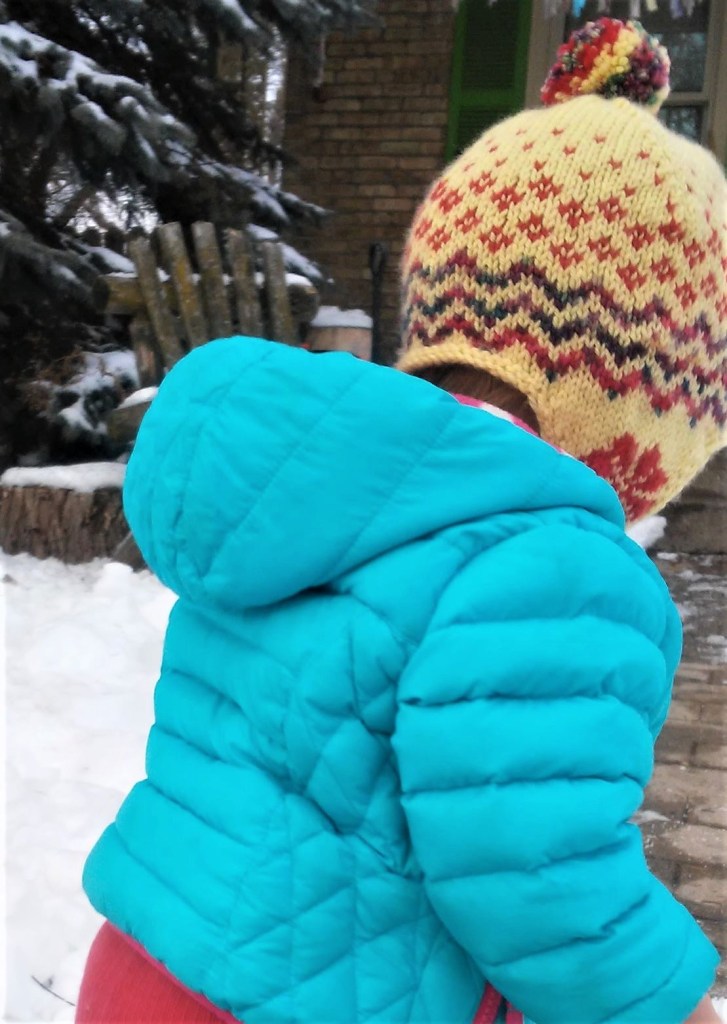
UPDATE: Hat was received, and put into use quickly. Not only does it cover the ears, it covers the cheeks as well. It’s so big that it will still fit her next winter.

Posted in sewing

Baby needs a new pair of Shoes

My granddaughter has spent her whole life barefooted. And now, just as she is learning to walk, winter weather has arrived. How is a beginning walker going to gain confidence in her stride if the ground is cold, wet, and slippery? This situation has been weighting on my mind so I decided to do something about it. Hence the quest to make baby boots. I have some yardage of fake suede lined in fleece. It looks really warm. Perhaps it can be fashioned into footwear?

I found the following pattern on Stitches and Sunflowers and began to answer this question. The maker professes that these really will stay on the baby’s feet.

stitchesandsunflowers.com/diy-baby-snap-booties/

After downloading the pattern pieces, I cut them out of the fake suede.

It’s important to flip the heel pattern piece over before cutting the second one.

Begin by sewing the heel piece to the sole. I changed my machine needle to a larger number to deal with the thick fabric before sewing.

Those quilting clips really came in handy today!

After attaching the heels, a piece of elastic is sewn at the upper edges. I then turned the top edge over to conceal the elastic.

Notice that I trimmed away the fleece from the seam allowances.

Next comes the toe piece. I again sheared back the fleece from the seam allowances on both pieces before stitching.

After turning right side out I have a pair of cute suede boots.

All that remains to be done is to sew in some fasteners. I’m thinking of going with Velcro, since it can be adjusted for fat or thin baby ankles.

Yes! Soft AND warm. My little friends approve.
Posted in knitting

Finishing the Baby Fern Sweater

I had stopped working on this project until I could verify the baby’s arm length. My original design allowed for an 8 inch sleeve. To learn the truth I took a tape measure to the lake house. While she attempted to evade measurement by considerable wriggling, I won the battle, and determined her arms were 7 inches long. In the interests of planning for growth, I made the sleeves 7 1/2.

Finally moving on to the yoke. Remember, Elizabeth Zimmerman’s battle cry: Knit body to underarm, sleeves to underarm, unite! Here is the sweater after the yoke was worked as far as the first round of decrease.

My plan to keep the stockinette stripes evenly spaced worked out well. As I began to run out of yarn I added the white and pink stripes. The blue ribs were carried through by slipping those stitches in the white and pink stripes.

Yoke worked to 4 inches in depth. Per the EZ method, three rounds of decrease happen at 1/2hf, 3/4th and 4/4th of the yoke, or in this case, 2, 3 and 4 inches.

After sewing up the sleeve seams and grafting the underarm seams, I decided to use single crochet to finish the front edge including six button holes – 2 in the yoke, 4 in the body. Here is the sweater, knitting complete.

Now I’m off to my LYS to buy the buttons.

Posted in knitting, recycling

A Little Remake

In March my daughter gave me three garments that were in need of a remake. I have already dealt with the silk blouse and the brown cardigan. The third was a blue wool baby sweater which got machine washed in hot water by mistake. The consequence was that it thoroughly felted and shrank down to the size of a doll’s coat.

I had been mulling over what I can make from a felted sweater. No ideas came forth. Then I shifted my thinking and considered what could be done with the felt itself? Remembering a conversation that I had with my grandson, about the poor performance of hand-knitted mittens in wet snow, I hit upon the idea of felt mittens. Melting snow will rarely, if ever, penetrate a heavy felt garment. Could I make mittens for the baby with this felt?

To start with, I cut off the sleeves. They looked vaguely mitten-like.

Using a crewel needle and sock yarn, I blanket-stitched around the lower edges of the sleeves. Then I picked up and knit into the blanket stitches and joined for knitting in the round. I knitted the cuff downward in rounds. After a few rounds, I started 2×2 ribbing for about an inch. Then I decreased, knitting another five rounds and bound off loosely.

Cuff finished. Beginning thumb for right hand mitten.

The process for the thumb was similar, except I had to slice a one-inch gash in the heavy felt. About eight rounds of knitting later, I decreased with k2tog, pulled the yarn through the remaining loops and fastened off.

Here comes the fun part. I cut down the top edge, making the total length of the mitten 5 inches. The upper edge was closed with running stitch and then sewn with blanket stitch all around. Using pink and red yarn, I embroidered a heart on the back of the mitten.

The letter R is for Right Hand Mitten!

Right hand mitten is done. I do hope that this will be a workable mitten. Now to make the left hand mitten to match.

Rainbow Beanie Baby, holding the mitten for me while I make the second one.
Right-Hand Mitten’s buddy has arrived.
Posted in knitting

July Knitting

The wild storm that blew through here Sunday night left behind the most glorious, cool and dry air. With early morning temperatures in the upper 60’s, it’s just fine for knitting en plein aire. What better project for summer knitting than baby sweaters?

The knitting you see in the photo is the body of a sweater for Baby L. By the time real sweater weather arrives, she will be one year old. So I have sized this sweater in the 12-18 month range. This design is a yoked and button cardigan with a very full body slightly gathered at the chest. Here is my schematic.

I feel excitement at my future of making many knitted garments for a little girl. So many design elements to choose from – the head spins. I would call this one a vintage style, which is built upon a 12-stitch lace pattern sourced from Barbara Abbey’s The Complete Book of Knitting (1971 by Viking Press.) I will use Elizabeth Zimmerman’s percentage system and instructions for the Fair Isle yoke sweater found in The Opinionated Knitter (Schoolhouse Press) to fashion the yoke. The sweater is constructed from the hem up. As Elizabeth writes, “Body to underarm, sleeves to underarm, UNITE, which … sounds rather like a rallying call.”

Below please note the instructions from Abbey’s book and accompanying chart for the baby fern lace pattern: FYI, my gauge in pattern is 20 stitches = 4 in.

Now what to do with the sleeves? I decided that they would be bloused sleeves, not tapered, so as to match the body. In studying the lace pattern, I noticed that the lace panels are separated by a 3-stitch mini pattern of garter – stockinette – garter. If I expand this slightly and add two more garter stitches between the stockinette, I will have a 7 stitch pattern that works well with the lace. Here is how it looks:

Knitted outdoors this morning, enjoying sixty-seven degree air.

So that’s all the major decisions made. I will use the same 7-stitch pattern on the yoke. I only have two balls of this Berroco “Comfort” yarn. If I run low of yarn at the yoke, I will throw in some contrasting color rows. Oh, this is going to be fun!