Sketching with new friends from the local art association at Jo Allyn Lowe park.
An ancient willow tree, alive but split apart, dragging a branch into a shallow pool.

Sketching with new friends from the local art association at Jo Allyn Lowe park.
An ancient willow tree, alive but split apart, dragging a branch into a shallow pool.


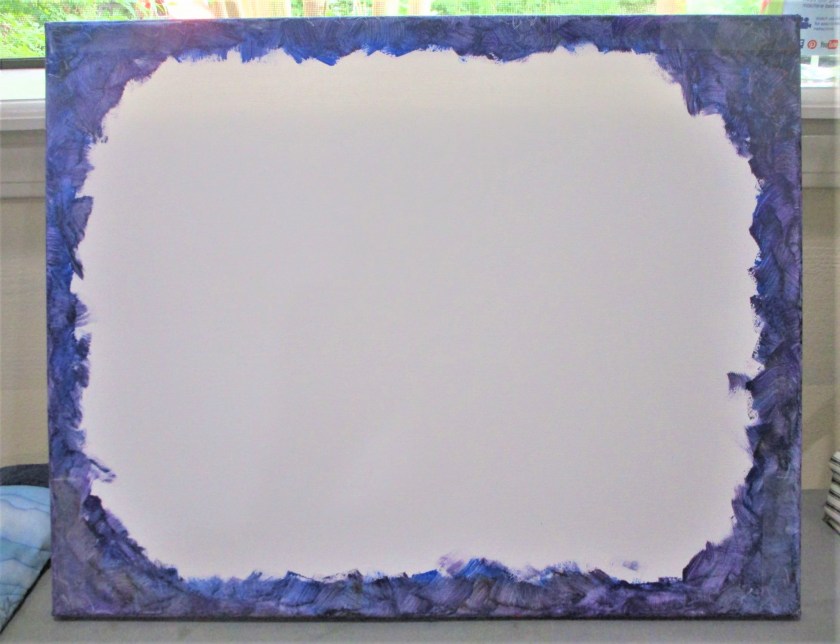
Here’s the Thread Art Baby with border and binding complete, mounted on an 18 by 18 artist canvas. It turns out that the finished dimension was Not a perfect 18 by 18 square. The damask napkin alone was shorter by one inch than it was wide. I chose not to square up the piece. So I had to fill in some color on the canvas.
I’m still happy with this one, and glad that it is now on my studio wall.

We are at Phase Two of pandemic recovery here in OK. That means our governor has allowed non-essential retail stores to re-open. I celebrated by visiting the local craft store three times so far to re-stock on some things and to buy new supplies for mounting my FOs.

I am following Cindy Anderson’s advice for attaching fabric works to stretched artists canvases.
https://wordpress.com/read/blogs/35439603/posts/27143
On the advice of blogger Melody Johnson…..
http://mixitupmel.blogspot.com/2014/07/small-quilt-presentation.html
…….I have acquired this little item.

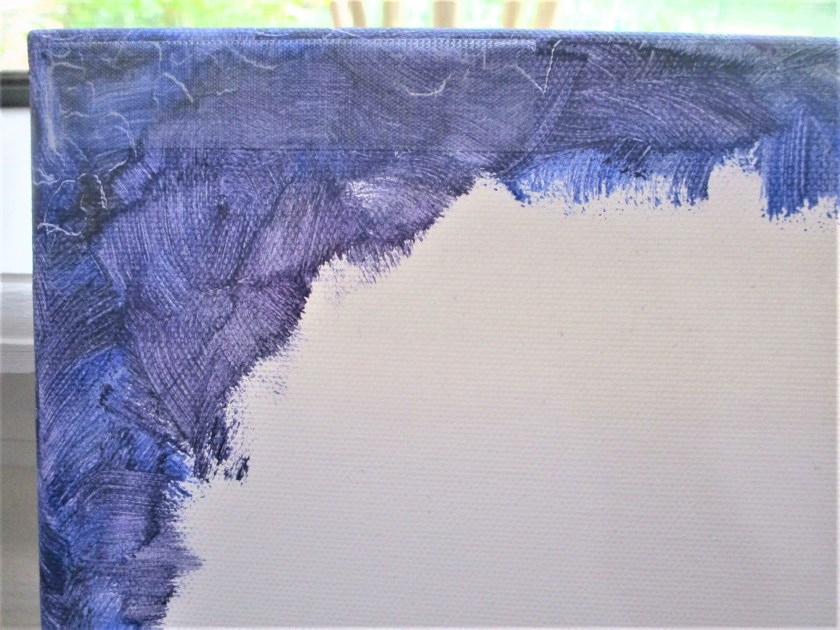
Today I will be mounting my Just Trees piece. For this one, I want to paint the canvas around and on the edges. This requires me to work with acrylic paint. I chose four colors of thin craft paint that has been in my stash for years. Here is my finished canvas, showing a wet-on-wet technique.
The colors will blend easily with the purple border on my fiber object.
I took at break for lunch while the paint dried. Then I attached the Velcro tape and waited for 15 minutes, per the package instructions.
Lastly, I attached the quilt, pressing the two sides of Velcro together. It worked like a charm.

View of the quilt from the right edge, showing paint:

It is very satisfying to get my work up on the wall. I had a lot of fun today, playing in paint, and I look forward to getting all of my finished art quilts show-ready.

This is a qualified finish. I still need to quilt the border and bind the edges. But the creative work is essentially done. I chose to use echo lines to quilt the background. The work went swiftly and smoothly.

The cotton damask fabric is a joy to work with. I had the benefit of a fresh needle in my machine, thanks to the delivery of my on-line order from Bluprint.com.
Following the example of Lola Jenkins, I used Prismacolor pencils to color the image. I had never tried this medium on fabric before. But by working slowly and carefully, I managed okay, rendering shadow and highlights modestly. Here she is as of today.

Here is a close-up of the subject.

I noticed that a damask vine landed smack in the middle of her onesie. I didn’t plan that placement, but serendipity happens. So I chose to leave it unpainted and embroidered a running stitch around it.
At 18 inches square, this piece is a good size for framing or mounting on artist canvas. Perhaps the arts supply store will open soon and I can buy what I need. In the meantime, she will be tacked up on one of my foamboard panels, allowing me to admire her on a regular basis.


How many of you remember a time when fine dining took place on a table set something like this? Okay, don’t answer that. I’d like us all to maintain our youthful appearances. I do remember that time – perhaps 30 or so years ago. Back then I went to the extent of buying crystal glassware. But the silverplate and the damask linens were given to me by the generation ahead of me. Every once in a while I get out the silver. The pale pink damask napkins you see in the photo were a gift from my mother-in-law. I’ve never found a use for them that fits my current lifestyle. They have been in the back of the linen closet, unused, for almost twenty years.
But that ended this week, thanks to Lola Jenkins and Thread Art. While stashing away some other fabric, one of the napkins fell out onto the floor. Timing is everything! It came to me that I could sew a portrait on this pale pink piece of fabric.
The subject I have in mind is my grand-daughter, from this photo taken at four weeks.

I decided to overlay this image onto one of a daylily. How about this one?

In the thread art process, the photographs are manipulated to size, and then the contour lines of the image parts are marked up. Here is the baby photo after marking.

I enlarged the flower until the baby could settle comfortably into the center of it. Oops, the baby is missing a foot. I manipulated one of the daylily petals to cover the place where the foot should be. After more fiddling, I came up with this.

Now to transfer the lines to the fabric. This proved a little trickier than I expected. I first tried the chalky transfer paper used in traditional embroidery transfers. The lines were way too faint and uneven. Then I found, in the deep recesses of my sewing cabinet, an Aunt Martha’s transfer pencil. Using this tool, you mark up the back side of the image, lay the marked side against the fabric and press with a hot iron.

You get bright pink marks that ARE PERMANENT. But I am living by Lola’s slogan today – and Going For It! I will be covering all the pink lines with black thread.
For the best results, the quilt sandwich should include interfacing fused to the quilt top. I did that and then I cut the batting and backing, pin basted and started quilting.

Here she is at close of business yesterday ……………………
…………….And here is the image with all the contour lines stitched.

So far, making this fiber object has been challenging and fun! I’m so happy to have found a use for the damask napkins.
The next steps are to quilt the background and then add color to the subject. Lola Jenkins uses colored pencil. I will start with that medium, but I may experiment also with some fabric markers. After all, it’s time to go for it.

