Posted in Uncategorized

Bent Out of Shape

We’ve all felt it. It happens at home, at work, while driving or walking. An unintended slight. A harsh word of criticism. A rude gesture flung from the window of a passing car. Generally, we are able to return to our earlier state with no visible change. Well, perhaps another minor scar on our psyches. Our treasured objects can also get “bent out of shape.” Frequently this means the end of the item. But, just like us, some of our fiber objects can be restored to their original shapes with the application of some attention, a warm bath, and a gentle massage.

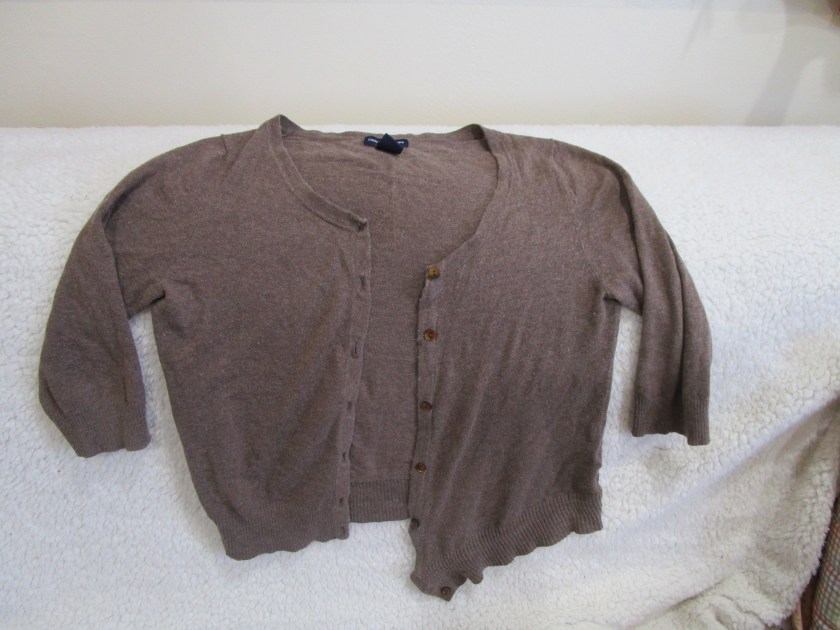
This little brown sweater had an unfortunate encounter with the agitator of the washing machine. Not that I would machine wash my sweaters. But sometimes a sweater can slip in unnoticed, by clinging to other garments on the way to the laundry. Notice that the left edge has been dragged down several inches, pulling the neckline with it. The fiber content is cotton and cashmere, so there is hope that the remedy will be sufficient.

  1. Fill a sink with tepid water and add a small squirt of mild soap. I use liquid dish detergent or sometimes shampoo. Drop the garment into the water. Let it get thoroughly wet. Now, squeeze the garment, working the entire thing gently without a lot of pulling.
  2. Drain the water out. Squeeze out the excess soapy water. Draw another basin of water, also tepid. Rinse the sweater by squeezing the water through. Drain water away, squeeze out excess water.
  3. Lay the sweater on a bath towel, roll the towel up, and massage the roll for a minute or two.
  4. Unroll the towel, remove sweater to a flat space. I lay mine on the guest room bed. Gently pull the misshapen sections back into alignment. You may insert small towels into the sleeves to help with shaping.
  5. Leave alone until thoroughly dry.
There now. Feeling better, dear?

It worked. Those tiny wrinkles can be pressed out with an iron set to low.

Posted in Uncategorized

First day of Spring

While we were away from home, spring fully arrived. Once the daffodils open up, it’s time to think about gardening. I love spring, and I love planting. To me, it’s about beginnings. The garden offers many inspirations for working with fiber. Heck, nearly all fibrous things that I know of started out as plants!

For today’s project, I wanted to draw from the imagery of the old-timey seed packet. Here is a fairly simple example that might have been sold 70 or 80 years ago:

I really like the slightly ornate lines drawn around the edges of the packet. I’ll be turning again to the Bernina to come up with my version.

First I made a basic drawing of the center image,

traced the parts, and cut the tracing into pattern pieces. These were pinned onto red and green fabric and cut out. The backdrop is a piece of cotton bed sheet. The pieces were attached to the backdrop with fusible webbing.

That took a lot longer than I expected!

Next I used satin stitch to outline the tomato parts and secure the rough edges of the fabric. I added the label (Burts Seeds.) To render the filigreed edging of the original image, I used an embroidery stitch which resembles ivy.

All Done! A little fabric pen jazzed up the leaves.

Perhaps tomorrow I will plant some seeds from a real packet.

Posted in Uncategorized

Travel Knitting

Today I am traveling, and so cannot create a fiber arts object for this post. Instead, I will review the Rules of Car Knitting, for your consideration:

  1. Do not distract the Driver.
  2. Use a circular needle. You know, the one with the flexible cable connecting the two points. This is pretty much all I use anyway, unless I am knitting socks or some other narrow circular shape. In the car, you may drop a few stitches, but you won’t drop one of your needles between the two seats, into some remote, inaccessible location. Avoid using a cable needle and double points for the same reason. You may use stitch markers at your own risk.
  3. Choose mindless knitting. In other words, something you can knit out of your head, that doesn’t require you to read a chart or paper pattern. Following a pattern will give you a headache, and could also distract the driver.
  4. To avoid car sickness, wait until you are on the interstate before starting.
  5. After dark, check with the driver before you turn on a cab light to see your knitting. I know certain people who profess to knitting in the dark. (My daughter claims that she can knit in a darkened movie theater.) You are not one of these people, and your knitting will have mistakes.

That’s about it. I wish you happy travels and uniform stitches.

Posted in Uncategorized

Colorwash Mash-up Part 2

My pieces of hand-painted fabric are now dry. So here we go with the mash up. The first step is to create a warp and a weft from the two fabrics:

  • Blue fabric on the left is warp. Cut vertically.
  • On the right is the weft. I made some artistic swoops with this fabric.

Time to get out my Bernina. I will admit that I am not an expert seamstress. My mother, who is, gave me this machine last year. It has languished largely unused on a shelf in my studio, but now it is urgently needed, to assemble my mash-up. First I cut a piece of fusible fabric in the same size as the “warp” fabric. Then I weave the pieces together like this:

All woven and pinned. Looks good to me!

After fusing the sandwich together with a hot iron, I start sewing the edges of the weft fabric down. Next I sew the warp fabric edges down.

Nearly done.

A quick press and the colorwash mash-up is complete. I used a royal blue thread to give a strong contrast to the watery colors in the fabrics.

Finished piece. On the right, the audience applauds with approval!

Posted in Uncategorized

Colorwash Mash-up

Here’s a break from the knitting blogs. I plan to use two swatches of fabric that have been hand-colored with acrylic paint, and weave them together. If all goes well, the final result will be an interesting fabric suitable for working into a quilt. I painted this piece last month, using Jacquard Dye-N-Flow paints on an old bedsheet:

The fabric I have chosen to combine is a white on white print:

Kind of ordinary. Because the flowers are printed on the fabric, they will resist the paint. I actually have two pieces of this fabric. Here they are after colorwashing:

Part 2 of this project will happen tomorrow, after the paint dries. See you then!