Posted in colorwork, drawing, hand embroidery, sewing

Inspired by O’Keefe

My fiber efforts have been rather uninspired over the last two days, so no new posts. Then I picked up this book written by Georgia O’Keefe. It is an autobiography told in her own words and in beautifully reproduced images of her paintings. It got my creative thoughts moving again.

While she spent most of her life living in and painting the American Southwest, in the early stages of her career O’Keefe was best known for her large-scale paintings of flowers. Here is what she has to say about these works:

Nobody sees a flower – really – it is so small – we haven’t time – and to see takes time, like to have a friend takes time. If I could paint the flower exactly as I see it no one would see what I see because I would paint it small like the flower is small. So I said to myself – I’ll paint what I see – what the flower is to me but I’ll paint is big and they will be surprised into taking time to look at it.

Exhibition catalog, An American Place, 1939

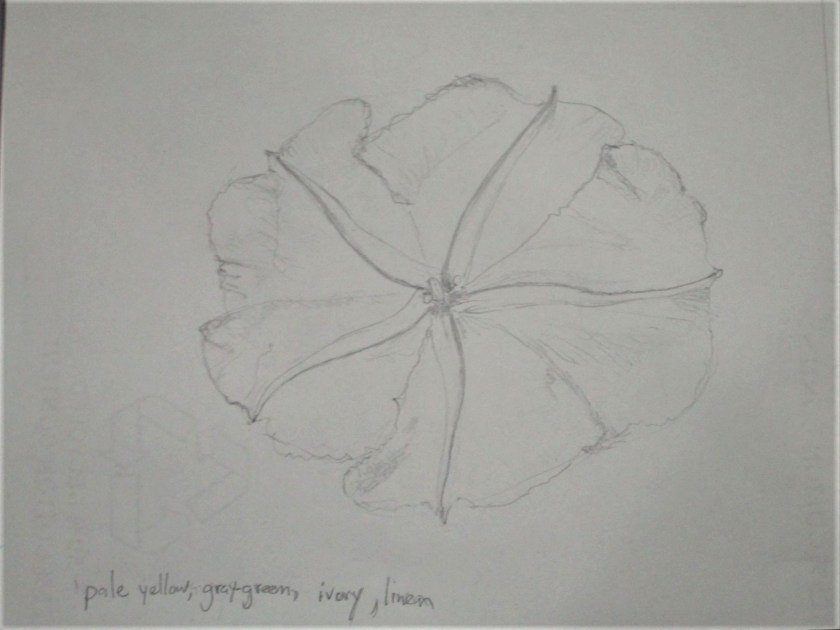
So I decided to create a fiber flower, because I want to look closely at a flower. I chose to make a Moonflower, partly because of its star-like shape, and partly because I don’t see them growing around here. When I lived in Texas, I grew some moonflowers. It was way too hot to enjoy the garden during the day. Instead I sat outside at dusk, when I could watch the moonflowers swirl open.

Here is a pencil sketch I made of my moonflower:

I plan to use white poplin for the flower, with fabric paint on the shaded areas and embroidery on the bright areas. Here are some green fabrics I have chosen for the background and the flower shape I will cut from the white poplin.

The next steps are to piece together and sew the background.

Background with paper template showing flower placement

Tomorrow I paint.

Posted in colorwork, hand embroidery, sewing

Haiku illustrated

So here is what has happened since you last checked in with the haiku project. I have transferred the image of the jaguar to fabric.

Using Jacquard Textile paint, I added the features and spots to this beast.

Next I hand embroidered the details, including eyes, ears, mouth, paws and whiskers.

Here are the fabrics I chose, in the general layout I wanted.

The next step was to embroider the haiku onto the dark green rectangle. It was important to me to replicate Henry’s handwriting as well as I could. I enlarged the original on the printer. Using chalked paper, I traced over the letters to mark them on the fabric. Then I embroidered the letters in white floss.

Finally I appliqued all of the pieces to the background fabric, machine-stitched around the raw edges, and embroidered the last few white whiskers on the cat. Here is the piece in its current state:

Henry’s Haiku

And here is a final close-up of the jaguar.

My original goal for this piece was to illustrate Henry’s poem, and to practice embroidering hand writing onto fabric. At the outset, I never expected to paint the fabric so much. But I’m glad I did it. I learned more about how to apply paint to fabric. And I ended up with a colorful and meaningful piece of fabric art.

Posted in hand embroidery, sewing

Henry’s Haiku

During a recent visit, my grandson handed me this post-it note containing a haiku that he had written.

Henry’s Haiku

Henry is a boy of few words, so I got almost no explanation on the source of these bonne mots. My husband reminded me that we had visited the zoo with Henry, and given him a camera to use. The poem may have been inspired by the sight of a jaguar cub. Here is a photo that my husband took that day at the zoo.

Looks like White Whiskers to me.

I am inspired by this poem and the photograph to make a fiber object featuring a white whiskered cat and Henry’s haiku. I’m planning to use applique and embroidery techniques. There is a very nice image in NatGeo of a jaguar cub in the jungles of Brazil with a good layout.

Here are some fabric options. I am thinking about using the color washed gold fabric as the background for the piece.

To be continued………….

Posted in quilting, sewing

The Last Day of Fiber Arts Class

Today my fiber arts students finished up classes for the year. I can hardly believe that I taught children a fiber arts project every week for eight months! In the end, I feel that I gained just about as much as I gave. While the students tell me that they learned a lot and had fun, I also learned much about making things with fiber in the process of developing lesson plans. Our last class was the wrap-up on string quilt samplers. The quilt tops made in previous weeks had backings added, were quilted, and bound off. Here are some images at the end of today’s work:

Zion, Age 11
Madelynne, Age 11
Louis, Age 12
Gianna, Age 13
Ezekiel, Age 10
Emma, Age 10

I love that the designs are all so different from each other. Some of the students incorporated the fabrics that they color washed. It took a lot of patience and perseverance for them to finish these quilt samplers. I’m very proud of their accomplishments.

Posted in drawing, sewing

Newsflash – It’s Paper Week!

Newspapers, and nearly all sorts of other papers, are made from fiber. So it is fair game for the Daily Fiber manipulations. The invention of paper can be described as one of the great technologic leaps forward for humankind. As far as I can tell, it was invented multiple times independently around the world. The ancient Egyptians made a sort of paper out of the sedge plant Cyperus papyrus. The type of wood-pulp paper we use today was invented by the Chinese around 2nd century BCE.

Thanks to fellow WordPress writer Jill Kuhn https://artjillkuhn.wordpress.com/ for encouraging me to explore stitching on paper. In no particular order, here are the objects out of paper I propose to make this week.

  1. Paper weaving of portraits
  2. Paper beads
  3. Rice paper Bento Box collage
  4. Collage with sheet music and old maps
  5. Quilling with paper
  6. Origami art installation

As a warm-up, I machine-stitched on some Sumi ink drawings that I did many years ago, when I had an interest in painting Chinese characters. The first is a bamboo image done on newsprint. I stitched the central veins on the leaves.

Wishy-washy looking.

It worked okay. The paper is quite brittle, and the beginnings and endings of the stitch lines tend to pull out of the paper. I’m considering reinforcing them with clear tape on the back of the paper. The next image is painted on rice paper. While this paper is quite thin, it seems a little more resilient than the newsprint paper.

This piece is better than the bamboo, but still a little tentative.

I have high hopes that the rest of the week will bring interesting results using paper.