Posted in collage, recycling

Paper Beads

Paper week continues with an exploration on turning paper into beads. I like the idea of taking a 2-D substance and making it into a 3-D object. Paper bead making started in Victorian times, after paper had become inexpensive and plentiful. There were so many well-bred ladies needing a large variety of well-bred activities to keep those hands busy. In the 1920s and 1930s the craft had a resurgence. At that time it became popular to use the beads in jewelry-making. I suspect it was the frugality of the craft in a time of scarcity that made it appealing during the Depression. Now in the 21st century, the technology and process of paper bead making has changed very little. All you need to get started is any kind of paper, scissors, all-purpose glue and a double-pointed knitting needle. Additional useful items include a cutting board, grid ruler and some masking or painter’s tape to wrap around the needle.
(Check, check, check and check!)

The process seems simple enough – cut wedges of paper, roll around the knitting needle, glue down edge and repeat until you have enough beads. But just in case I’m missing something, I spend an hour viewing U-Tube videos. Would you have guessed that there are crafters making and actually selling these beads? Those folks use some tools and materials such as PC Hardener that I will not purchase for my little experiment. But I did buy a jar of Mod Podge. It is coated on the beads to give them more structure. I guess this acquisition places me firmly in the category of Crafter with a capital C. Here is my first round of beads:

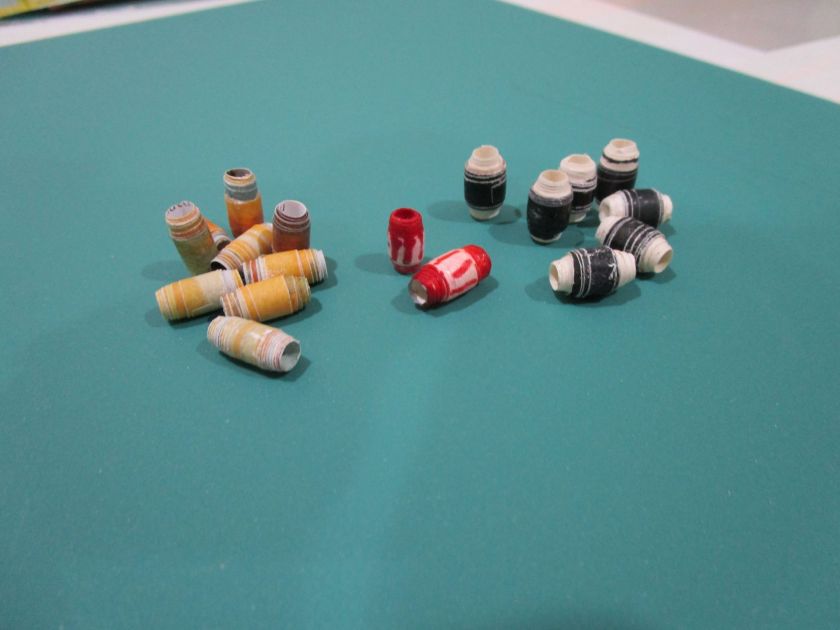
The yellow beads are rolled-up magazines. The red beads are basic copy paper colored with a red Sharpie. The black and cream-color beads are made with copy paper and then a strip of narrower magazine paper. This is the style I like the best. It has a nice barrel shape and a slight shine from the black magazine paper. I made more beads of this style in prettier colors:

The blue paper is a print-out of one of my color wash fabrics. The magazine strips are from a photograph of blooming heather. I really like the color combination. I ended up making eighteen blue-purple beads. Here they are strung up on a silver chain with one of my turquoise pendants.

Some of the professional bead makers add silver spacers between each bead. It gives a much more polished appearance. I might be tempted to make more beads. But I won’t be making enough to use up ALL the Mod Podge.

Posted in recycling, weaving

Boho Basket

I’m staring at this really ugly wire basket which has been pressed into use in my studio. You may know the kind – available through Container Store. While it is commodious, it isn’t pretty.

Poking around in my linen closet, I identified several cotton woven placemats that are refugees from the eighties. We really liked these colors back then – peach, mint green, mauve and pale blue. They haven’t seen the light of day since I moved them sixteen years ago to our present home.

IT’S TIME TO RECYCLE!

I decided that the wire which ran the length of the basket would be the warp, and the cut-up placemats will be the weft. The opening between wires are 1 and 1/4 inch.

I cut up the placemats parallel to the warp, and across the weft. It is my hope that the full-length warp threads will keep the strips from fraying. I sewed two strips together so that they stretch down both sides and across the bottom of the basket. Here is the color sequence that I settled on:

After a bit of sewing and weaving, my new Boho-style basket is finished. Here it is, put into service holding yarn:

I like this . And it feels good to re-cycle stuff that’s just taking up space in a closet. However, I must admit to you, dear reader, that this project produced a bunch of lint!

Posted in crochet, recycling

Consider the Plastic Bag

It is my stated goal to explore the possibilities of everything fiber, or even fiber-ish. Plastic bags seem to accumulate at an alarming rate in my home. This photo shows the orange plastic bag that my daily paper comes in, if the weather is even the least bit damp. Recycling these wrappers is not an option in my community. Of course the re-use option is the most likely destination for this item. I don’t have a dog, so that re-use is not going to happen. I re-use them occasionally to cover my paint rollers temporarily, if I am unable to finish the paint job in one day. But considering that the wrappers are long and narrow, I wondered if they could be woven, crocheted or knit?

The answer is yes to all three. I started out by knitting and, indeed, came up with a respectable looking little orange swatch. But I couldn’t think of any use for it. I moved on to crochet, using my no. 15 hook.

  1. I connected the wrappers with clear tape. I tried sewing them end to end, but the plastic clung to my needle every time I pushed it through wrapper.
  2. Here is my chain, slip-stitched together.
  3. Here is the finished object, viewed from the bottom. My husband says it looks like a bunch of Cheetos.

The object ended up as a sort of Koozie, or in this case, a cover for a plant pot. I inserted a glass jar, added a cotton bow and filled with herbs. One could just as easily insert a cold beer which would likely stay cold until consumed.

My conclusion is that one can crochet a bunch of plastic together, but it isn’t fun and it isn’t pretty. The result is a bit of a “sow’s ear” trying to be a “silk purse.”