Posted in recycling, sewing, weaving

Fiber Fun at the Lake House

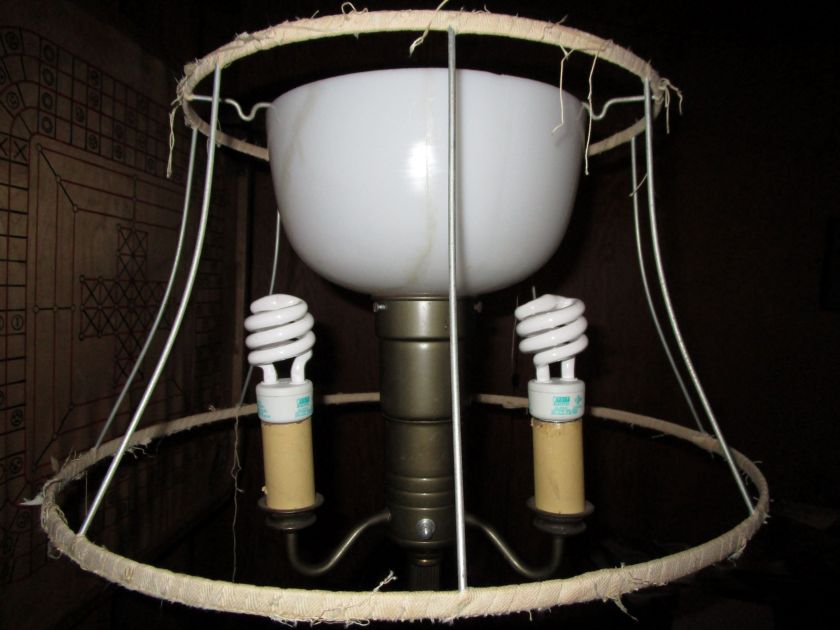
While I and my family were soaking up the sun and splashing in the water at the Lake House, my daughter proposed that we work on a fiber project together. The family lake house, which was built in the 1950s, contains random pieces of furniture and what nots from several decades. The object of attention is a floor lamp with a silk shade that had disintegrated completely. Used in its present condition, the unshaded light got into everyone’s eyes. She thought we could solve this problem.

Of course, the Lake House Challenge is to make it work with limited materials and tools. After a bit of brainstorming, during which we rejected piecing panels together and shirring or gathering fabric, we came up with a weaving concept. We had on hand a few bed sheets and a ball of cotton blend yarn.

Yarn is left over from the Luna Moth baby dress project.

Fortunately, Daughter had brought her sewing machine.

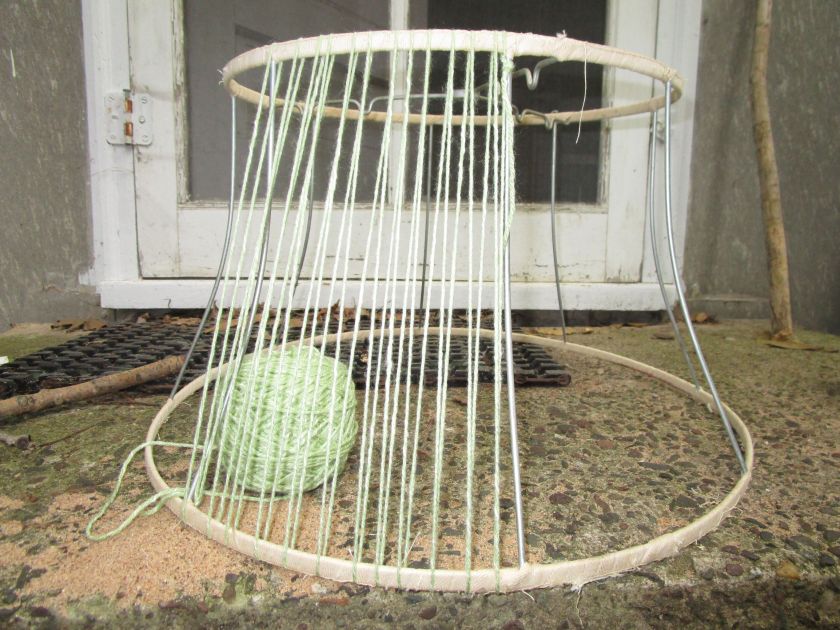
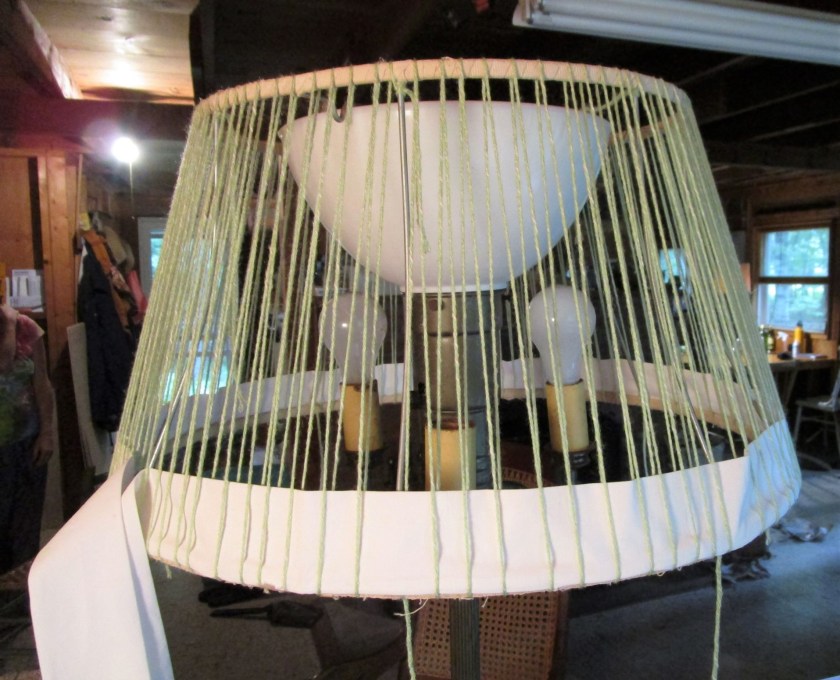
I took on the task of warping the yarn over the lamp shade frame and she hemmed and turned the strips of white sheet. They were about 2 inches wide. We thought we would need six rounds. Here is the shade with the warp in place and the first round of weft weaving.

It took a few days because it was possible to work only while the baby was sleeping. She sewed together the two ends of each strip and trimmed up the yarn.

FINISHED LAMP SHADE.

We agreed that it was pleasing to the eye in a bohemian kind of way.

Posted in knitting, recycling

A Little Remake

In March my daughter gave me three garments that were in need of a remake. I have already dealt with the silk blouse and the brown cardigan. The third was a blue wool baby sweater which got machine washed in hot water by mistake. The consequence was that it thoroughly felted and shrank down to the size of a doll’s coat.

I had been mulling over what I can make from a felted sweater. No ideas came forth. Then I shifted my thinking and considered what could be done with the felt itself? Remembering a conversation that I had with my grandson, about the poor performance of hand-knitted mittens in wet snow, I hit upon the idea of felt mittens. Melting snow will rarely, if ever, penetrate a heavy felt garment. Could I make mittens for the baby with this felt?

To start with, I cut off the sleeves. They looked vaguely mitten-like.

Using a crewel needle and sock yarn, I blanket-stitched around the lower edges of the sleeves. Then I picked up and knit into the blanket stitches and joined for knitting in the round. I knitted the cuff downward in rounds. After a few rounds, I started 2×2 ribbing for about an inch. Then I decreased, knitting another five rounds and bound off loosely.

Cuff finished. Beginning thumb for right hand mitten.

The process for the thumb was similar, except I had to slice a one-inch gash in the heavy felt. About eight rounds of knitting later, I decreased with k2tog, pulled the yarn through the remaining loops and fastened off.

Here comes the fun part. I cut down the top edge, making the total length of the mitten 5 inches. The upper edge was closed with running stitch and then sewn with blanket stitch all around. Using pink and red yarn, I embroidered a heart on the back of the mitten.

The letter R is for Right Hand Mitten!

Right hand mitten is done. I do hope that this will be a workable mitten. Now to make the left hand mitten to match.

Rainbow Beanie Baby, holding the mitten for me while I make the second one.
Right-Hand Mitten’s buddy has arrived.
Posted in recycling, sewing

Wabi-Sabi 2

I spent the better part of yesterday afternoon sewing the little wabi-sabi blouse. Getting to know the automatic button stitch on my Bernina was a bit of an eye-opener. It took four practice button holes before I was ready to attempt it on the garment. So the buttonhole is fine now, but I am having some fit issues.

Finally I called my daughter, to discuss the blouse and check her measurements. She was enthusiastic about my progress so far. Then she casually mentioned that the blouse was constructed with the buttons on the BACK. What?

After the call, I put on the blouse, switching it around so buttons were in the back. Sure enough it seemed to drift into place over my body.

A new point of view.

I will need to adjust the button locations (most of them are not centered over the button holes) and take in the band to match daughter’s measurement. Otherwise, this little turnabout is done!

Posted in recycling, sewing

Wabi Sabi

A Japanese philosophy that has been around since the 15th century, wabi-sabi is all about finding beauty in imperfection. It means keeping your old stuff, especially if you really love it. A few high quality garments are more valuable than a bunch of new, poorly constructed items of inferior fabric. Sometimes a few minor repairs will keep your treasured frock in circulation. It’s really okay if the repairs are visible.

When I was explaining this concept to my daughter a few months ago, she said that she had just the thing for a wabi-sabi treatment. What she brought me was a silk blouse, in a muted print of neutrals that had become worn and torn. She said that she wore it often, but no longer, due to rips and thin places in the silk. Could I do something with it?

I wish I had taken a photo of the blouse as she handed it to me, but alas, I did not. Here is what the garment looked like after I had cut out the damaged sections.

Three months have passed since I gained possession. This morning, I decided it was time. Last year I had purchased a largish silk blouse in similar colors at a thrift store for a few dollars. This might be a good source of fabric for the wabi-sabi blouse.

My plan is to cut this blouse lengthwise along the stripes, and use the pieces to rebuild the yoke of daughter’s blouse. Here is a sample of the fabric.

And here is a sketch of my intended alterations.

Without a pattern, I set about cutting and sewing, cutting and sewing. First I made some strips from the thrift store blouse and used them to create a band at the underarm area. This was stabilized with ultra-light weight fusible interfacing. Next I cut two triangles from the front of daughter’s blouse and trimmed the edges with black silk. These pieces were then sewn to the band. A few alterations to the back also included black silk edging.

It’s the end of the day, and here is a photograph of the wabi-sabi blouse.

Progress is good. If all goes well tomorrow, I will finish the structure, make a buttonhole, sew the buttons back on, and maybe add some decorative elements.

Posted in recycling, weaving

Button Loom

When thinking about all things fiber, I occasionally ponder the role of objects associated with fiber. Buttons come to mind very quickly. Who doesn’t have a handful (or jarful) of these tiny essentials? While they are often mundane adjuncts to your cardigans, coats and jeans, is it possible for buttons to step out of the ordinary? Let’s make something that gives them a stellar role. I am designing and building a button loom. This loom won’t handle the work of any serious weaver. But it can hold the warp threads for a modest tapestry. If positioned artistically, the buttons can become a key design element of the finished object.

Among my collection, I have two dozen metal shank buttons that were saved from various worn-out blazers and jackets.

The pretty silver ones came from my mom’s stash of vintage buttons.

If I sew them very close together on sturdy upholstery fabric, and then wrap the fabric around a wooden frame, it could start to become a loom.

The button-covered fabric rectangles were wrapped around the short sides of the black frame and stapled in place. I used the glue to prevent fraying.

Here is my finished frame with warp threads in place. I have used cotton and acrylic yarns for the warp, pulling and tying them together at the lower edge of frame.

Next time I will weave the tapestry.