Posted in painting

Update on my Watercolor Journey

It’s been over a month since I worked in watercolor paint. I’m disappointed in myself for dropping out of a self-imposed daily practice. Even though I am busy with two quilts, the desire to improve my painting skills is ever present. It’s time to pick up my brush again.

To that end, I signed up for a 10 week program of in-person art classes. The instructor is Ross Meyers, who is offering the classes at our local art association. After my first lesson (drawing), I got all ambitious again, remembering that I wanted to paint some snow scenes this winter.

Winter Woods

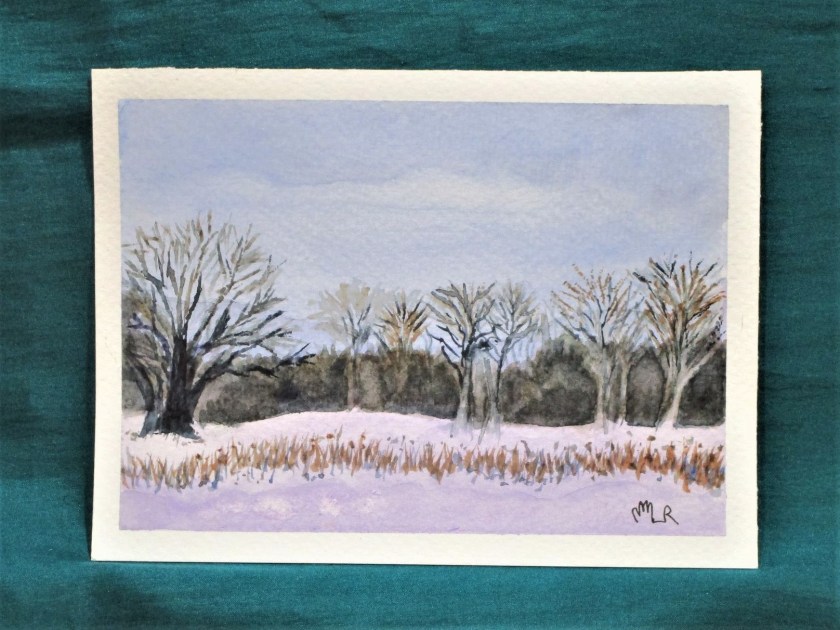
You may recall that I am working on 4 by 6 inch pieces of Fabriano Studio cold press paper. In this little painting I am practicing with carbazole violet. I like the way that shadows on the snow pick up cool hues of blue and violet. The reference photo I am looking at is by Catherine Arcolio, who posts under the name Leaf and Twig. In her posts she combines beautiful photography with a brief poem.

The Two Of Us – leaf and twig (wordpress.com)

The second painting is another experiment with violet. I laid down a graduated wash and let it soak in briefly. Then with a rigger brush, I lifted the paint vertically.

The resulting image reminds me of snow blown onto tree trunks. I added some pencil marks to accentuate this impression.

For the next layer, I will come back with full strength violet and a rigger brush to make grasses in the foreground. I will use a dry brush technique and maybe some black paint to further refine the tree trunks.

After my next art lesson, I’ll write about what I am learning, and whether I think it is worthwhile.

Posted in quilting

SAHRR Challenge #6 – Almost Done

This week’s assignment is Log Cabin block. I’m a fan of this block and find it useful in improvisational quilts and as a background for art quilts. When I woke up this morning, I had a good idea for incorporating this block into my design. So I got right to work on the challenge.

Because I have not yet sewn the wonky stars border on, I can still incorporate the log cabin blocks into it. My plan is to use the pale blue fabric and the flowered batik fabric to make four log cabins and attach them in the corners of the wonky star border. For the final challenge (whatever it may be) I will use the flowered batik as my primary fabric. This will tie what has come before to what comes next. Follow along and you will see.

Here are my four log cabins.

I used a one and one half inch center and cut the light and dark strips to finish at 3/4 inch. These are three rows of each color, giving me a finished block of 6 inches – the same as my light blue star border.

Next I got out my fabric paint and added a metallic motif to each center square.

I think they look like eyes in the heavens.

Laying each block with the pale blue to the inside and the batik fabric to the outside, I get this effect:

Lower right corner
Lower left corner

With the log cabin blocks done, I return to building the quilt sandwiches for the four sides. They will be about 12 inches wide each. This includes enough allowance for the quilting. At this point, I am expecting my quilt to finish out at around 60 inches square – a good size to use as a lap blanket.

Don’t forget to check in with the others who are building round robin quilts. They are showing a tremendous variety of styles and some ingenious solutions to the challenges.

Posted in knitting

Swatch-on Monday

Members of the Blogville Knitters will recognize the pattern for Water. This pattern, offered by softsweaterknits.com, was selected by Alissa for our group knit-a-long happening in March. I agree with her – it is a beautiful shawl. It features some unique design aspects and challenging sections based on short rows.

So I am game to try.

The lace sections look just like waves of the ocean. But I didn’t choose a water color. I wanted to try something warmer. My Water shawl will look more like a lava flow.

I chose Wisco Sock, from Ewetopia, in colorway Dark Plum for the garter row sections. It didn’t photograph too well in the first picture. So here are my swatches, with a little digital adjustment.

The pink yarn I found at Harps and Thistle yarn store in Cuyahoga Falls, OH. While looking for a silk blend I picked up this Folio yarn by Berroco. It is not silk, but a blend of 60% superfine alpaca and 35% rayon. Never having knit with rayon yarn, I was a little skeptical about the resulting fabric. But store owner Cindy had used this yarn and experienced no issues such as pilling. The colorway is Cardinal, but it certainly doesn’t resemble any cardinal I have ever seen. Maybe it is more the shade of the Roman Catholic cardinals’ robes. Anyway, it is a color I currently do not have in a shawl.

So I am set with pattern, yarn and swatches. If I can trust the two that I worked up on no. 5 needles, both yarns give me the same gauge, in this case, 22 sts. per 4 inch row as called for by the pattern.

If you would like to knit along with us, you can find Water at:

Ravelry: Water pattern by Sylvia McFadden

Posted in quilting

SAHRR #5 – The Stars Above Us

After putting in a few hours of sewing yesterday and today, I find that I have something to show for this round after all. First of all, here is my assortment of wonky stars.

There are two sets of four – the smallest will finish out at 3 inches, the larger at about 4 1/2. While it took some patience to stitch on the tiny scraps of star points, I found myself enjoying the process. And in the end, they are so darned cute! I also made them fiery stars, in hot shades of yellow, orange and red. They jump right out from the pale blue background.

As I stitched along, though, I found my stars getting less and less wonky!

First Star
Last star

The blue border will be six inches wide. This will give the eye a good break from the dark and busy center of the quilt while allowing the stars to shimmer. Here are the assembled borders laid in place.

This project is so big, it is almost impossible to take a decent picture.

As you can see, the border is not attached yet. I am in the process of quilting the center body. My plan is to make separate quilt sandwiches for each border, attach them and then finish up the quilting by working around the edges. Or perhaps I will quilt them before sewing them on. Anyone have a recommendation for me on how best to manage this step?

If you would like to see the work of other quilters doing this challenge, follow these links:

Posted in quilting

Taking a Brief Pause from SAHRR 2021

After working out the details of Challenge #5 SAHRR 2021 (the wonky stars border) I paused before completing that border. My quilt is currently 39 inches square, and dangerously close to being too big to quilt on my Bernina. Therefore, I decided to start quilting the completed sections before adding any more fabric.

First task is cutting and layering the quilt sandwich. Getting the backing and batting smoothed out was a tricky chore since the quilt is too wide for my worktable. After I had managed it, I proceeded to hand baste every three or four inches – just enough to keep the layers from shifting while I sewed.

Yesterday I got about 1/2 way done with parallel rows of quilting. It looks like this on the back side.

I chose to hand embroider the central square, which emphasizes the shapes.

Still undecided on how to quilt those batik triangles.

The gray spokes were quilted in parallel lines about 1/2 inch apart.

Image showing machine quilting and hand basting.


I’ll continue to quilt until the section is finished. Then I hope I have time to sew on the wonky star border before being faced with Challenge #6.